Ecommerce Solution With CMS and Mobile App 1.0
Introduction
- Item Name : Ionic-React Woocommerce Solution
- Item Version : v 1.0
- Support Forum : Support
About #back to top
Ionic-React WooCommerce is an easy solution for pragmatic developers around the world. With just one single compilation you can create mobile apps for your WooCommerce website and publish the Apps on play store and Appstore. It accommodates massive number of very famous and essential plugins like
- WPML (WordPress Multi Language)
- WordPress Multi-Vendor and Dokak
- WC Points & Rewards
- Multi-Currency
- After ship
- One Signal
- You can create an app for any type of store. Ionic-React WooCommerce supports all types of products.
- As far as the payment gateways is a major consideration, you can integrate all gateways that are compatible with WordPress WooCommerce due to the web view feature facility.
- When it comes to shipping gateways, it allows all the shipping methods.
- Social login option through Facebook following just a few simple steps.
- Geo fencing is another highly demanded and dominating feature that can be activated by just putting the latitude and longitude readings of the location.
Objectives #back to top
Following are the objectives of Ionic-React WooCommerce:
- This ensures high sales, and in time delivery of the products.
- This reduces the time of transaction and payment.
- It allows visitors across certain boundaries to see and order the products.
- The ease of ordering and payment enhances the conversion rate.
- Extended options and ease throughout the transaction render more confidence and satisfaction to the customer.
Essentials #back to top
Following are essentials you must have before installation
- Wordpress site setup with woocommerce plugin
- Stable Node version
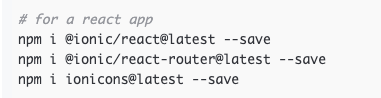
- Latest Ionic CLI
- Latest Ionic React CLI
- Latest Capacitor CLI
- Latest Android Studio with SDK Manager
- Latest XCode
- Facebook account to setup facebook login
- Firebase account setup
- OneSignal account setup for push notifications
What’s included in the package? #back to
top
The package include:
- Supported Plugin
- Customer App
Ionic-React Pre Requisites for installation
#back to top
Before you use the app and start the installation process on your machine, this is important points to know in detail.
Tools
For Ionic-React mobile app development, you need Ionic-React development environment ready. Please follow below official links to setup your development machine.
https://ionicframework.com/getting-started
https://ionicframework.com/docs/installation/cli
Application build and test dependencies.
Below given are the essential dependencies that are needed to build the application and also for testing purpose i.e
- WordPress 4.4+
- WooCommerce 2.6+
- Latest Node version
- Latest Ionic CLI Version 5+
- Latest Capacitor CLI Version
- Latest Ionic React CLI
- Ionic Framework Version: 5+
- Android Studio with SDK Manager
- XCode 10
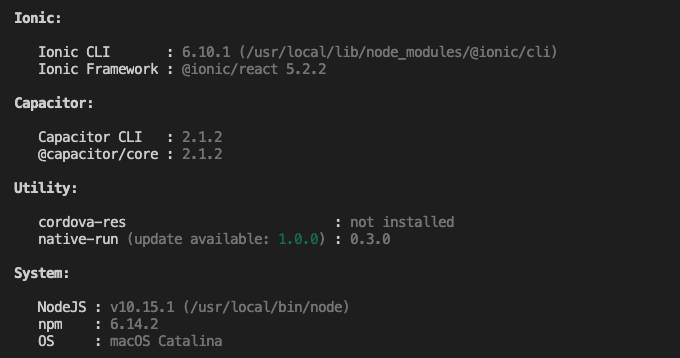
Application is tested in following enviroment
Source Code Setup
#back to top
Now we have set up the Ionic-React environment.
For install Ionic-React environment use this link
https://ionicframework.com/docs/react
You should have to install node modules in application first. For this purpose, apply following command
npm install
After node modules installation, if you find following error

Apply following command for successful compilation
npm rebuild node-sass
For configuration of your application
We need to connect our app with woocommerce website. Open the folder name (App Source Code)inside the downloaded packages.
Inside the folder, you will find all the Ionic-React application code.
You can need following file
folder/src/providers/WooComAPI/woo-com-api.ts

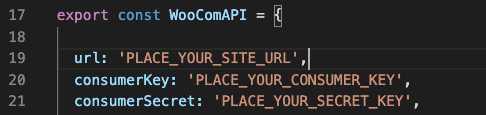
Now open project folder/src/providers/WooComAPI/woo-com-api.ts file and change the following.
- http://your-site-url (it will be the URL of your domain)
- consumer key
- consumer secret
It will load woocommerce products data into your application.
For application configurations:
- Color Schemes
You can change the application color from here.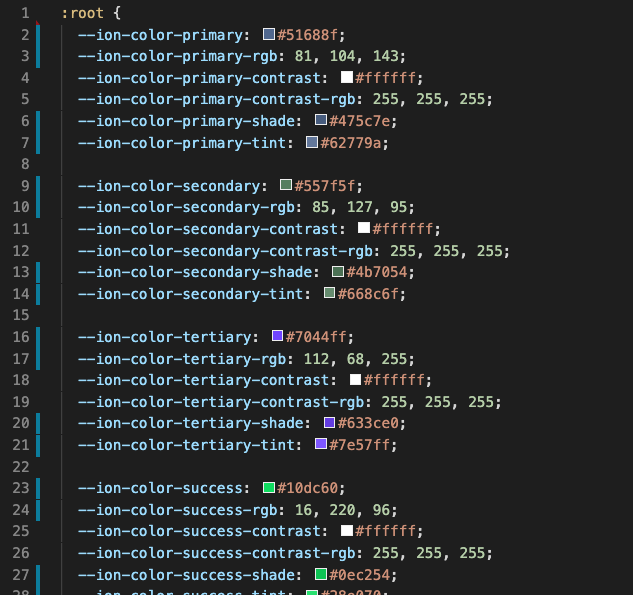
- Theme mode(light/dark)
By default you can get light theme mode. If you want to change application theme mode to dark, you can replace light with dark.
- Language(en/ar)
- Currency(USD/EUR)
- Navigation(Tabs/Side Menu)
The app has english language as default.the app has 2 languages(English, Arabic) preinstalled. You can switch the language to arabic.
To change the default language of the app. Please open the file app/src/providers/WooComAPI/woo-comp-api.js at the top of the page you can find below code.
localStorage.languageCode =”en”
This is your language two letter code change it to arabic we have to put the arabic country code here. which is “ar“.
localStorage.languageDirection = “ltr”
Every language has its own direction. So if you change the application language then you also has to define its direction(ltr, rtl). For left to right use “ltr” and for right to left use “rtl”. In case of arabic we have to change this to =”rtl”.

Now we have to remove the cache of the browser to see the changes we have made.
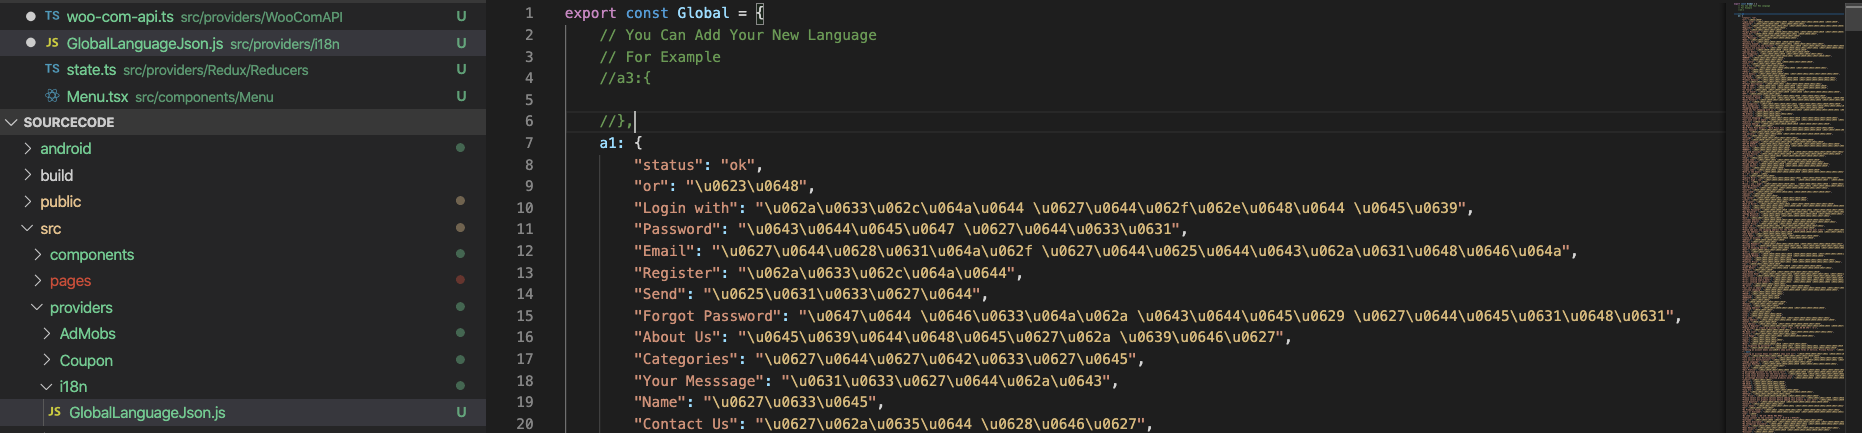
Add new language
App has only two languages. But you can add more languages.to add new language. Please open the app/src/provider/i18n/GlobalLanguageJson.js. This folder has one file GlobolLanguageJson.js. This file contains all the app labels.
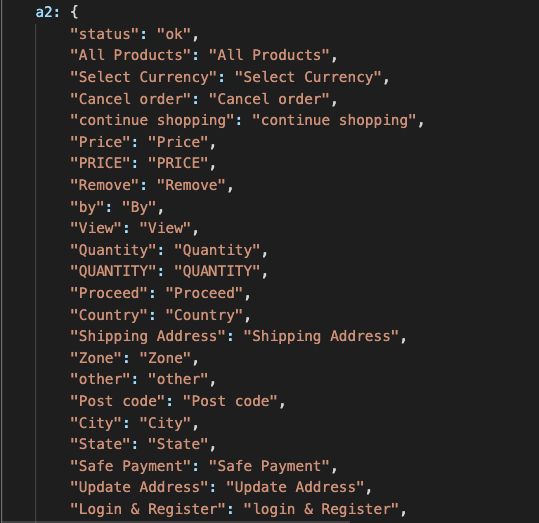
For example we want to add french language we copy the “a2” object from GolabLanguageJson.js file and add a new object a3{}
Then we open the file in editor and replace the translation of all the labels on right side of the labels. like
we have Close: “Close” in english, we replace it with french like this. Close: “Fermer”
After translating all the labels save the file and then change the language code and direction. To make it default.
// For Example
//a3:{
//}
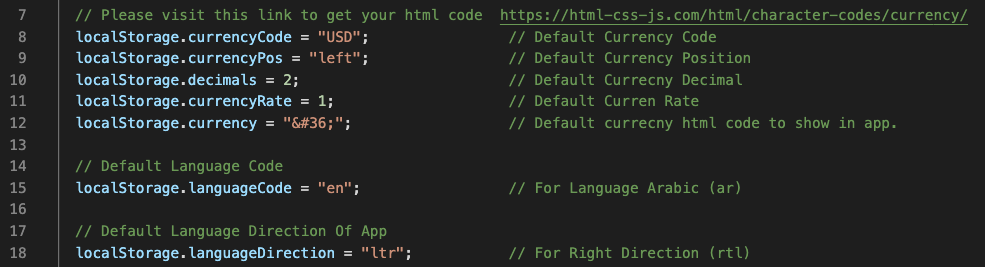
Default currency is "USD". You can replace this with "EUR" to change currency.

The app has “$” currency as default.the app can have multiple currencies depending to your admin panel
To change the default currency of the app. Please open the file
app/src/providers/WooComAPI/woo-comp-api.js
at the top of the page you can find below code.
localStorage.currency = “$”
this is the currency Decimal code. you can get your code from the link https://html-css-js.com/html/character-codes/currency/
Please find your currency Decimal code and replace it.
localStorage.currencyCode = “USD”;
this is currency iso code you also find this from the link https://html-css-js.com/html/character-codes/currency/
please find your iso code and replace it with above code.
localStorage.currencyPos = “left”;
you can also control the currency direction you can place it either left or right side. To change it to right just change the left with right.
localStorage.decimals = 2;
this is the decimal placement of the currency with decimal 2 your currency will look like this
6.00$ (six dollar with 2 decimal value)
6.000$(six dollar with 3 decimal value)
change the value according to your requirement.
Please remove the cache of the browser to see the effect of changes. or uninstall the app if you are testing in real device and rebuild the app.
Default navigation is "side". You can replace this with "tabs" to change applicaiton navigation.
For tabs, you have to replace false with true for tabs Navigation

Plugin Installation
#back to top
We have added JSON API and Ionic-React eCommerce plugins. These plugins can be installed in two ways.
You will find the JSON API and Ionic-React eCommerce plugins in a zipped folder in the pack.
Method 1
- Upload the folder “JSON-API” to your WordPress Plugin folder (/wp-content/plugins)
- Now activate the plugin through the “plugins” menu in WordPress or by using the link provided by the plugin installer.
- Activate the controller through the JSON API menu found in the WordPress Admin Center (Settings->JSON API)
Method 2
Go straight to the admin panel>Plugin>Add New.
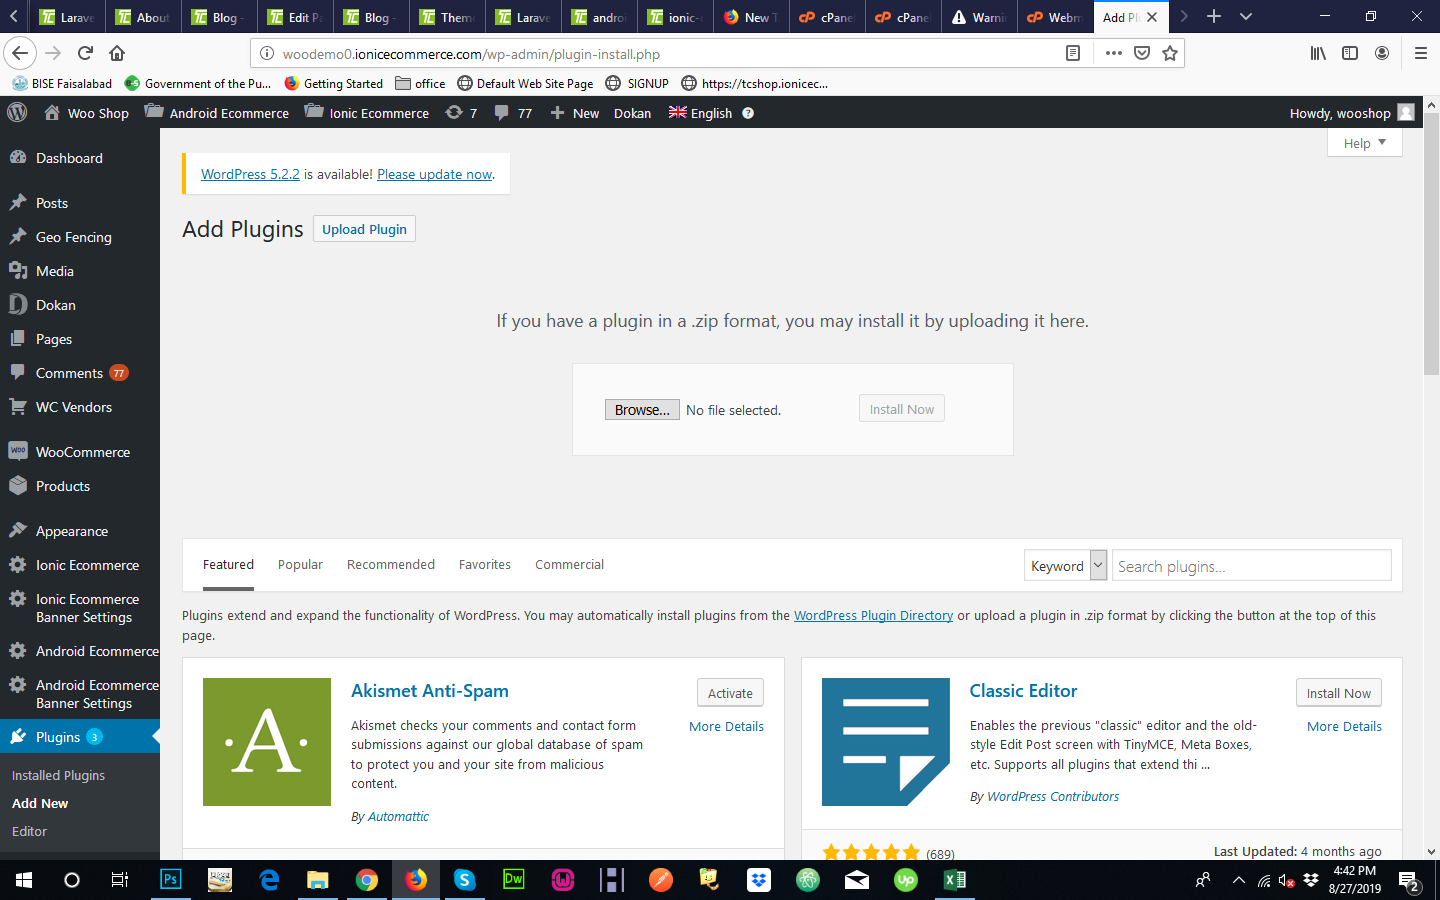
The above-given page will show up. From here, click on the “upload plugin” option, make sure that the plugin that you have is in .zip format. Click on the “Browse” option, upload the plugin folder and once the folder is chosen, click on the “Install Now” option”
Once the plugin is installed, you can activate or deactivate the plugin through settings according to your usage.
After WordPress plugins installation and setup, please follow the below-mentioned instructions to set up your mobile application.
After Intallation of plugin need to activate the controllers from Settings >> Json APi
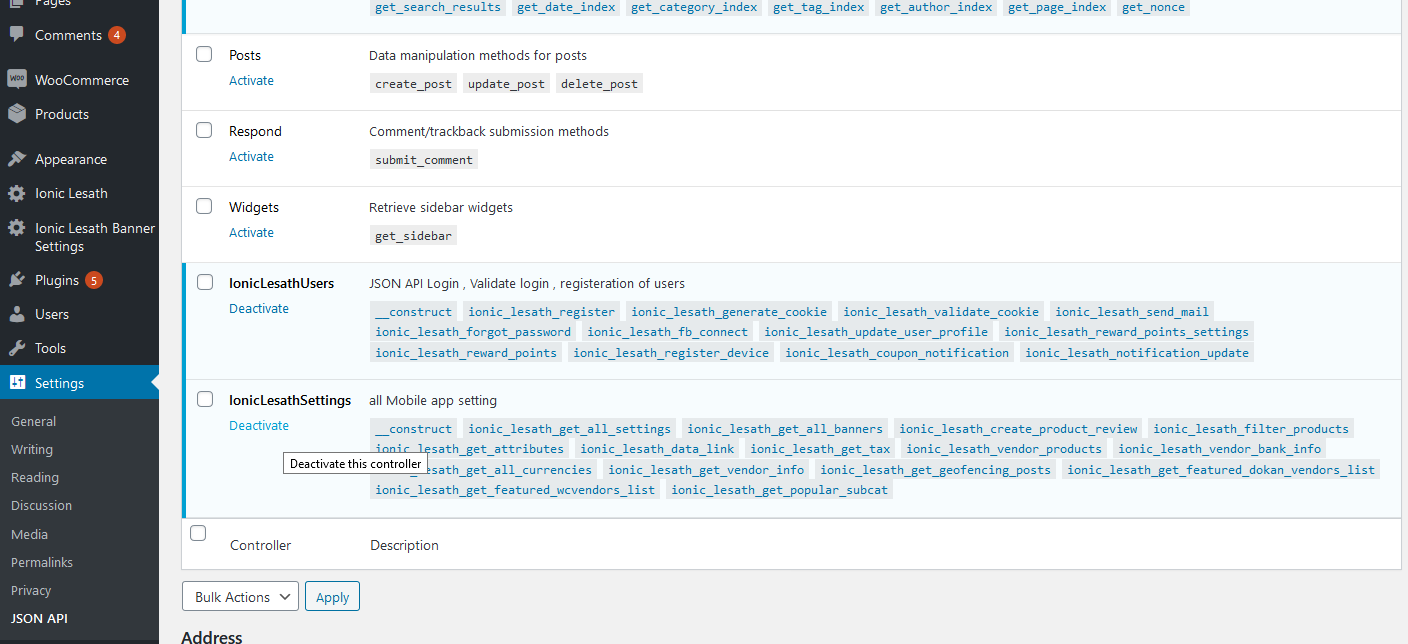
Ionic-React Woocommerce app works with woocommerce rest api, please follow the link below to enable woocommerce rest api on your server.
https://docs.woocommerce.com/document/woocommerce-rest-api/
After enable rest api, please make sure your site woocommerce rest api working correctly. You can follow that simple tutorial link to check whether rest api works correctly on your sever or not.
https://github.com/woocommerce/woocommerce/wiki/Getting-started-with-the-REST-API
Now you have all set at your wordpress site end. Please proceed with ionic source code setup.
Enable REST API & Generate API keys
To enable the REST API with in WooCommerce, go to WooCommerce> Settings> Advanced and tick the Enable Legacy API link
The WooCommerce REST API works on a key system to control access. These keys are linked to WordPress users on your website.
To create or manage keys for specific WordPress user:
Go to: WooCommerce> Settings> Advanced> REST API
- Select Add Key
- Select the user you would like to generate a key for, in the user file and add a description.
- Choose the desired level of access for this API key , which can be Read access, Write access or Read/Write access.
- Select the Generate API key button and WooCommwrce will generate API keys for that certain user. Once the keys have been generated, you will see two new keys, a QRCode and a Revoke API Key button. These two keys are your Consumer Key and Consumer Secret.
- Place your site link, consumer key and consumer secret in the mobile application config file that uses the WooCommerce API.
Facebook Login
#back to top

This allows you to log in through your Facebook credentials. Here is the official link with the detailed demonstration of Facebook integration
Facebook Integration
#back to top
You have to enable facebook from CMS.
For more details please visit
https://ionicframework.com/docs/native/facebook/
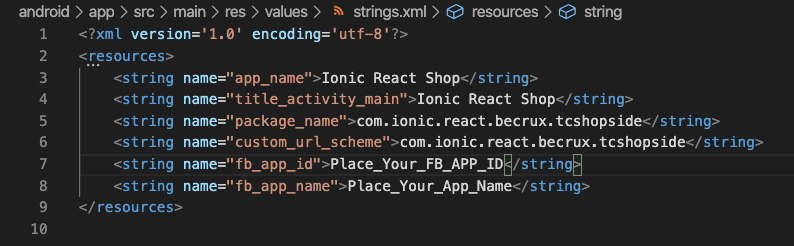
Facebook App Id for application
File path for your facebook app id for application is
folder/android/app/src/main/res/values/string.xml
OneSignal Notification
#back to top
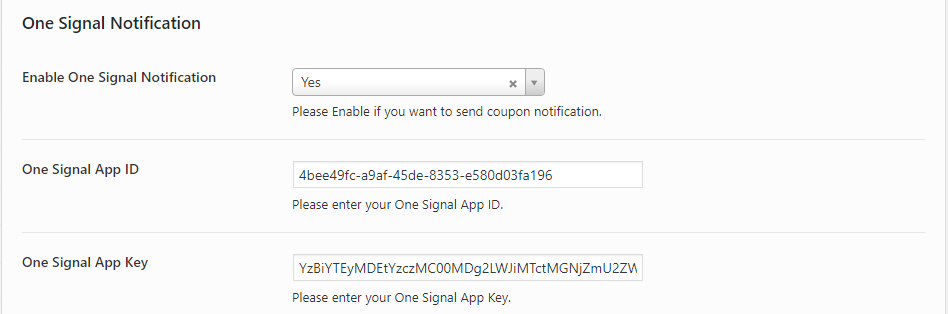
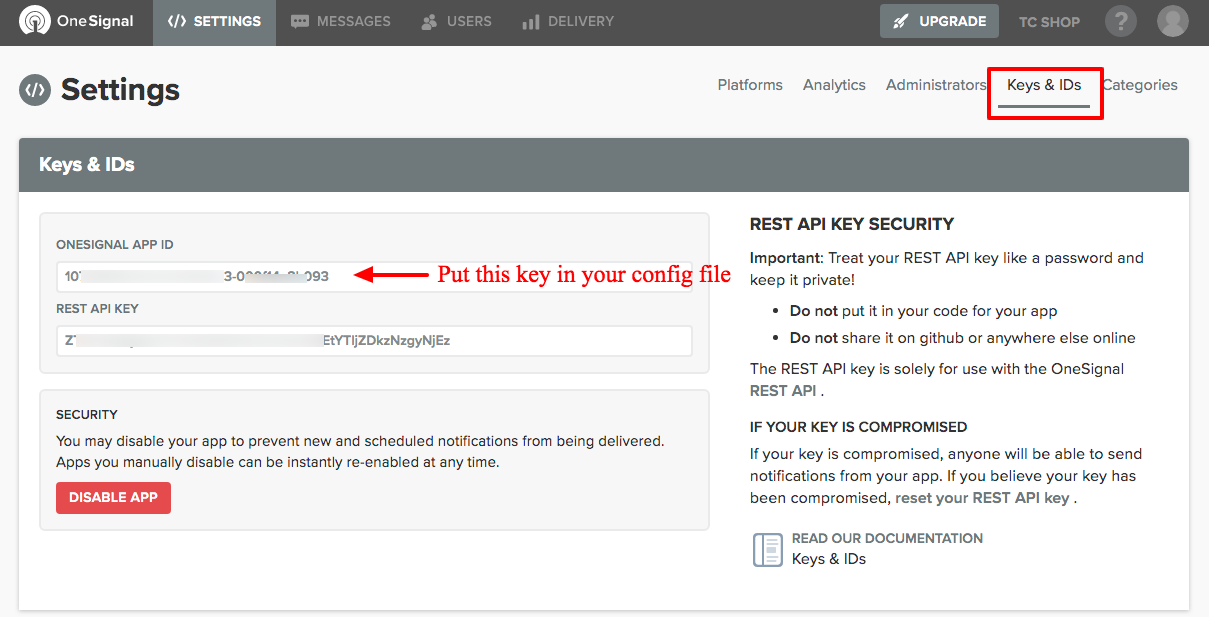
To avail of this feature, you need to create OneSignal account and obtain both needed keys that are App ID and App key. Place them here and make this feature functional. You can offer various discount coupons to your distinguished customers that would appear in their app like this
Here is the official link that would guide you throughout the process of OneSignal account creation
OneSignal Integration
#back to top
Android
Generate a Google Server API Key
Your Google Server API Key and Google Project Number are used to send push notifications to ANDROID devices.
To begin, we’ll obtain a Google Server API Key and Google Project Number. These keys allow OneSignal to use Google’s web push services for your notifications.
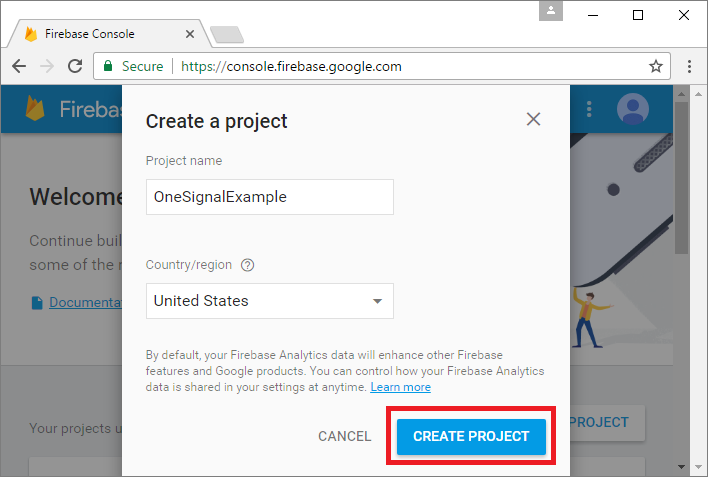
Create A Firebase Project
- Visit the Firebase Console and
sign in with your Google account.

- Press “CREATE NEW PROJECT” or select an existing
one below
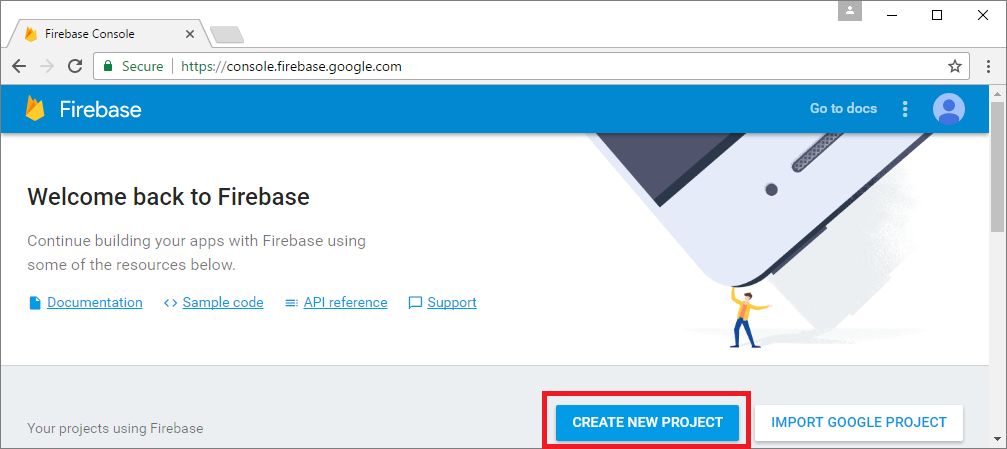
-
Enter a project name and press “CREATE PROJECT”.
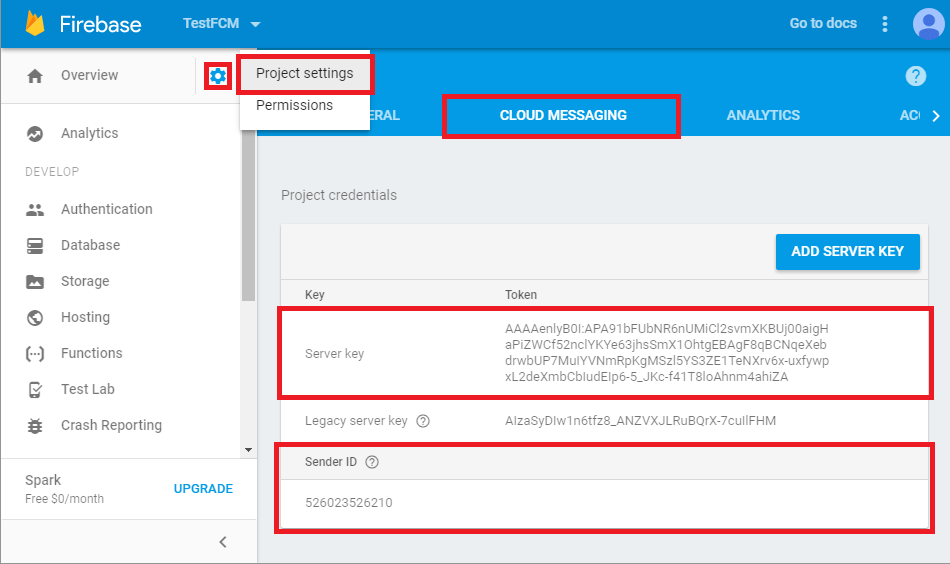
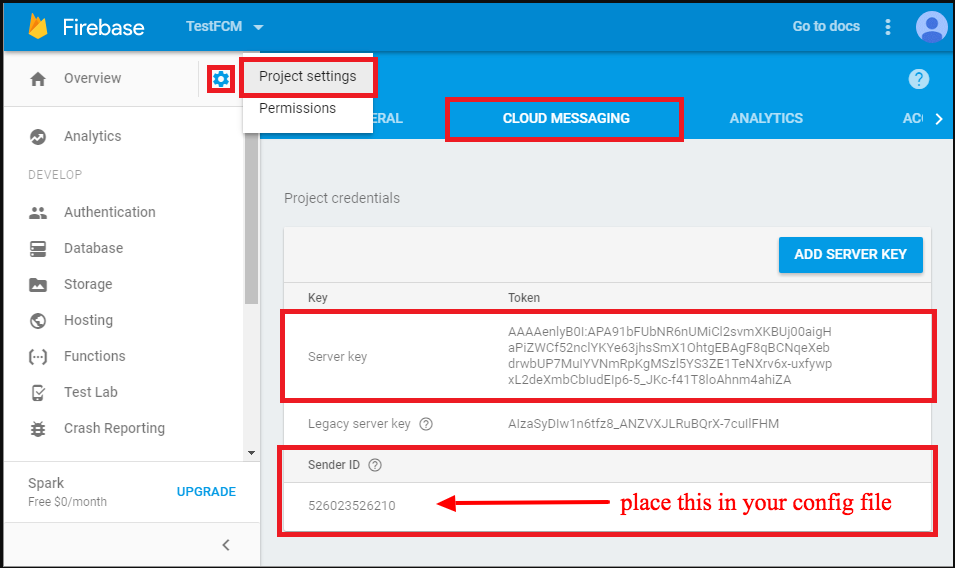
Firebase Cloud Messaging Token and Sender Id
Getting your Firebase Cloud Messaging token and Sender ID
- Click the Gear icon in the top left and select “Project settings”.
- Select the “CLOUD MESSAGING” tab.
-
Save the two values listed:
- You’ll need your Server key, also known as the Google Server API key.
- You’ll need your Sender ID, also known as the Google Project Number, later as well
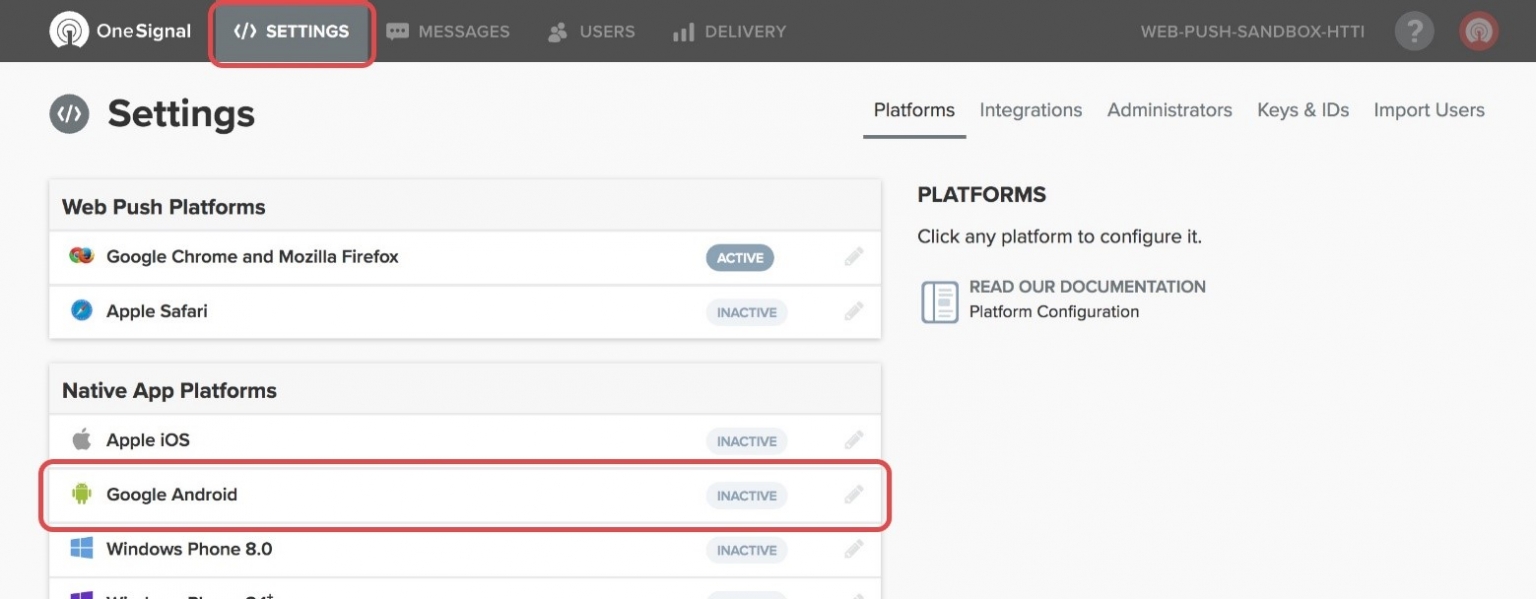
OneSignal App Android Setting
Configure your OneSignal app’s Android platform settings
- Go to Settings and press the Configure button to
the right of Google Android.
- Paste your Google Server API Key and Google Project Number in here
and press Save.
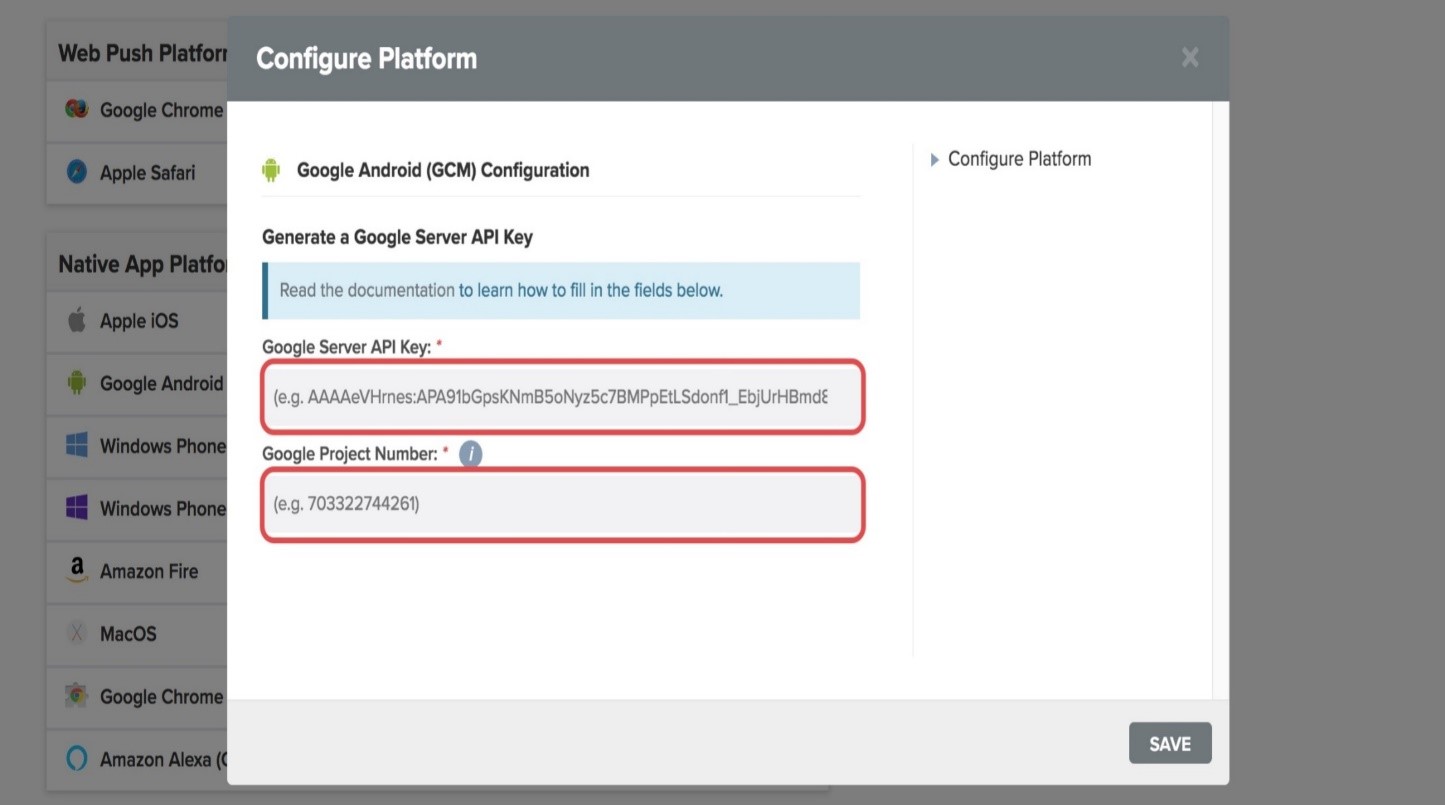
- After saving this server API Key and Sender
ID
from the firebase project, you can get the
one signal app Id from the setting
and your sender id from the firebase project
- place this app id and sender id in state.ts
(src/providers/Redux/Reducers/state.ts) file then save it.

IOS
Generate an IOS Push Certificate
Required for all IOS apps.
Required For Setup
- A OneSignal Account, if you do not already have one.
- Your OneSignal App Auth Key, available in Keys & IDs.
- A Mac with Xcode 8+. If you are using Xcode 7, PhoneGap Build, or Capacitor, follow this guide instead.
Provisioning
Option A: Create Certificate Request Manually
We recently released a tool to automate this process!
Make sure your role for the team is Admin inside your Apple Developer account > Membership section. Otherwise you will not be able to use this tool.
Simply follow the directions on OneSignal’s Provisionator Tool then continue to Step 4.
OR
Option B: Create Certificate Request Manually
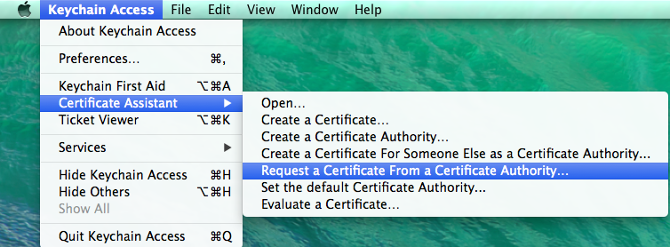
- Open Keychain Access on your Mac OS X system. It may be located in “Applications” > “Utilities” > “Keychain Access“
- Select “Keychain Access” > “Certificate Assistant” >
“Request a Certificate From a Certificate Authority…“.
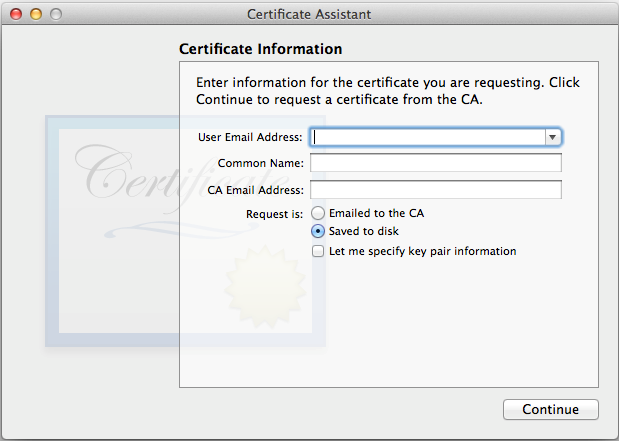
- Select the “Save to disk” option and enter your information in the required fields. This creates a certification request file that will be used
Enable Push Notification
To enable Push Notifications and apply the Certification Request to generate Certificate.
-
Select your app from the Apple’s
Developer site and press “Edit“.
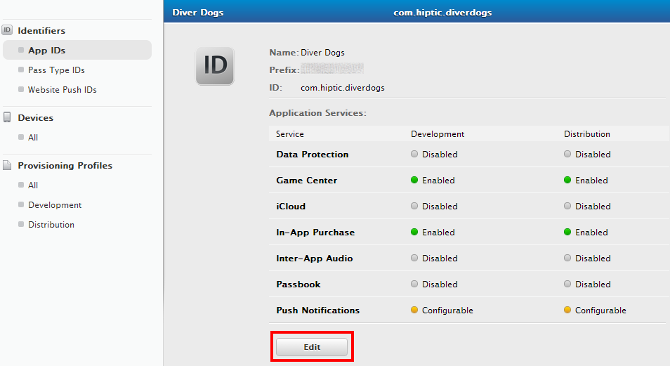
- Scroll down to the bottom and enable Push Notifications. Press Done, but do not configure either Production or Development certificate.
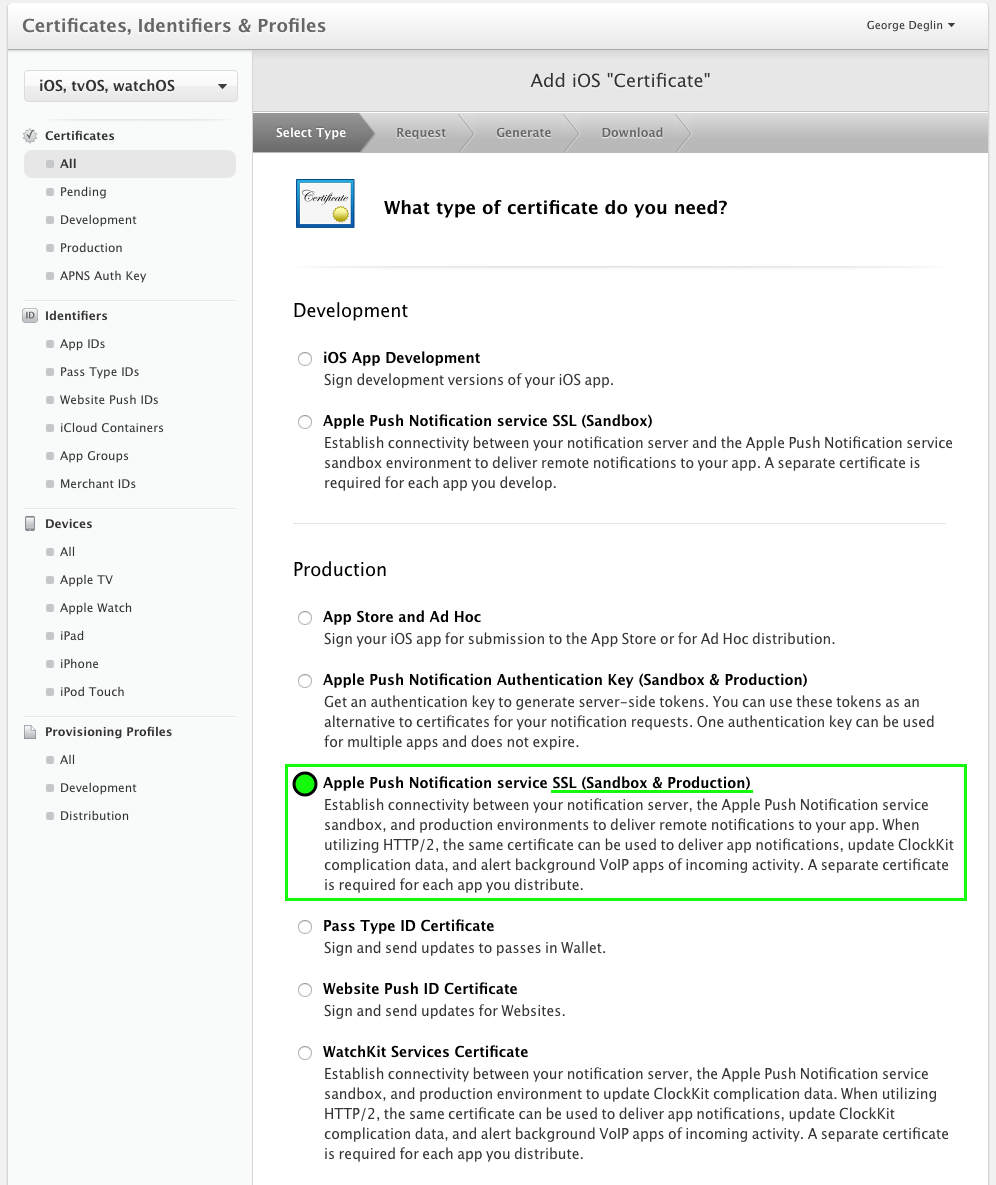
- Instead, go to Add iOS Certificate and select “Apple Push Notification service SSL (Sandbox & Production)” and click Continue.
- This certificate will be applicable to both Sandbox and Production
environments, so you do not need a separate key for each.
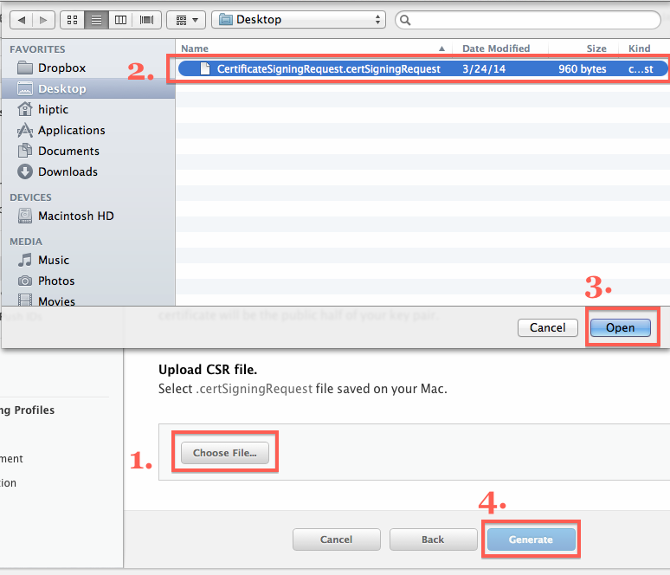
- Choose an App ID from the App ID pop-up menu.
- Press “Continue”.
- Press “Choose File…” select the “certSigningRequest” file you saved in step 1, press “open“, and then press “Generate“.
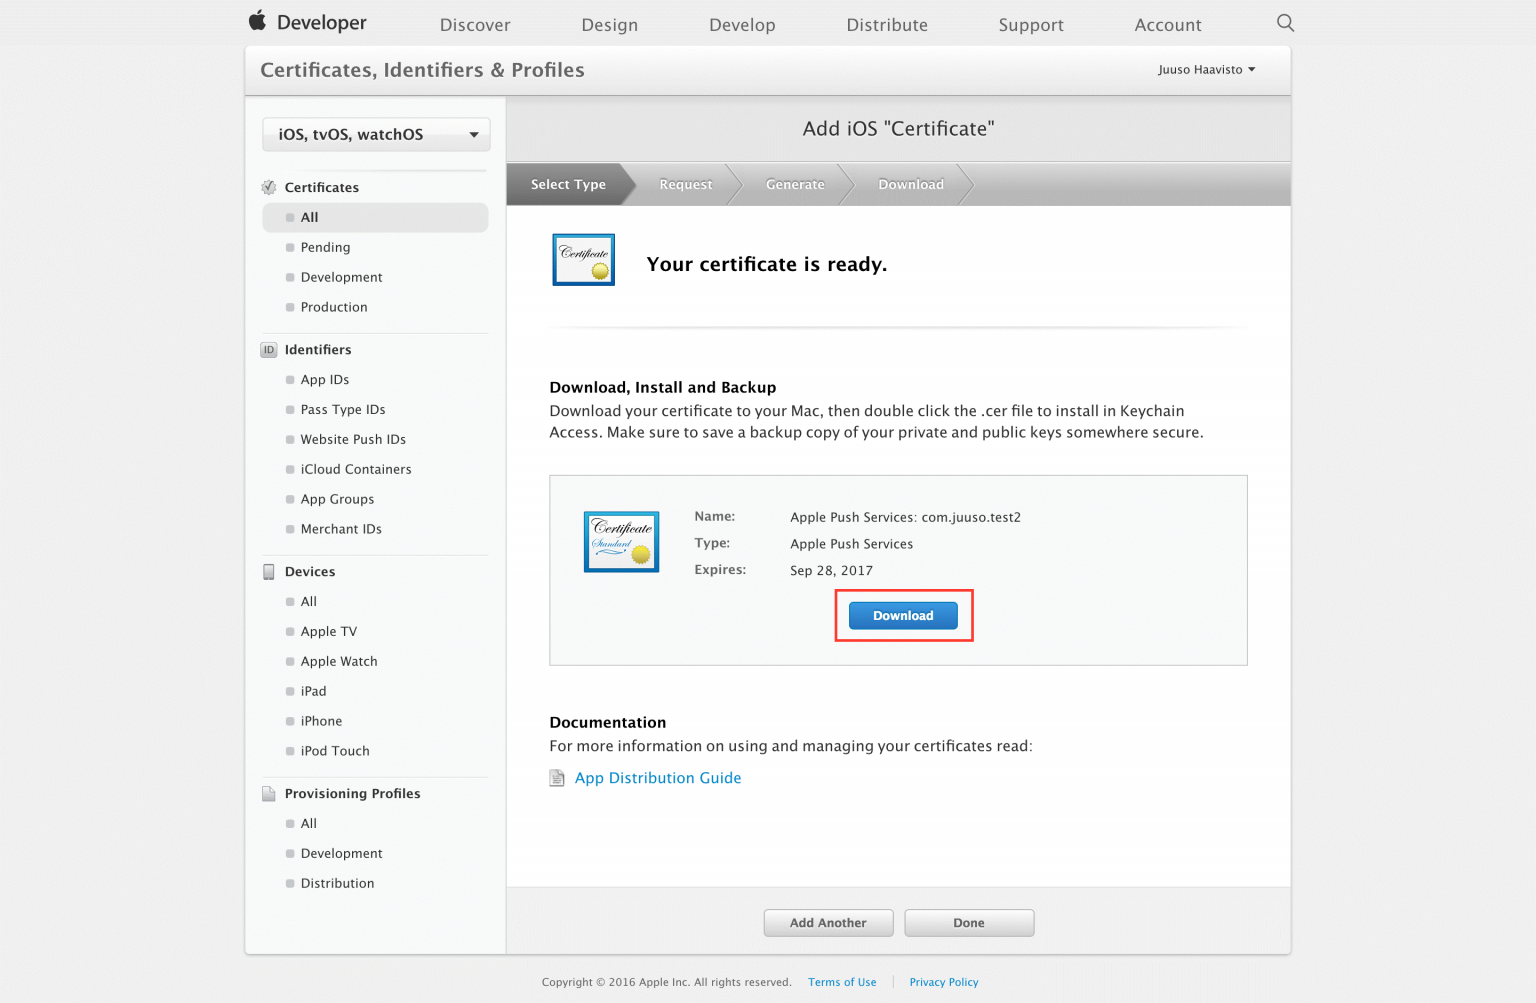
Press “Download” to save your certificate.
Creating A Private Key
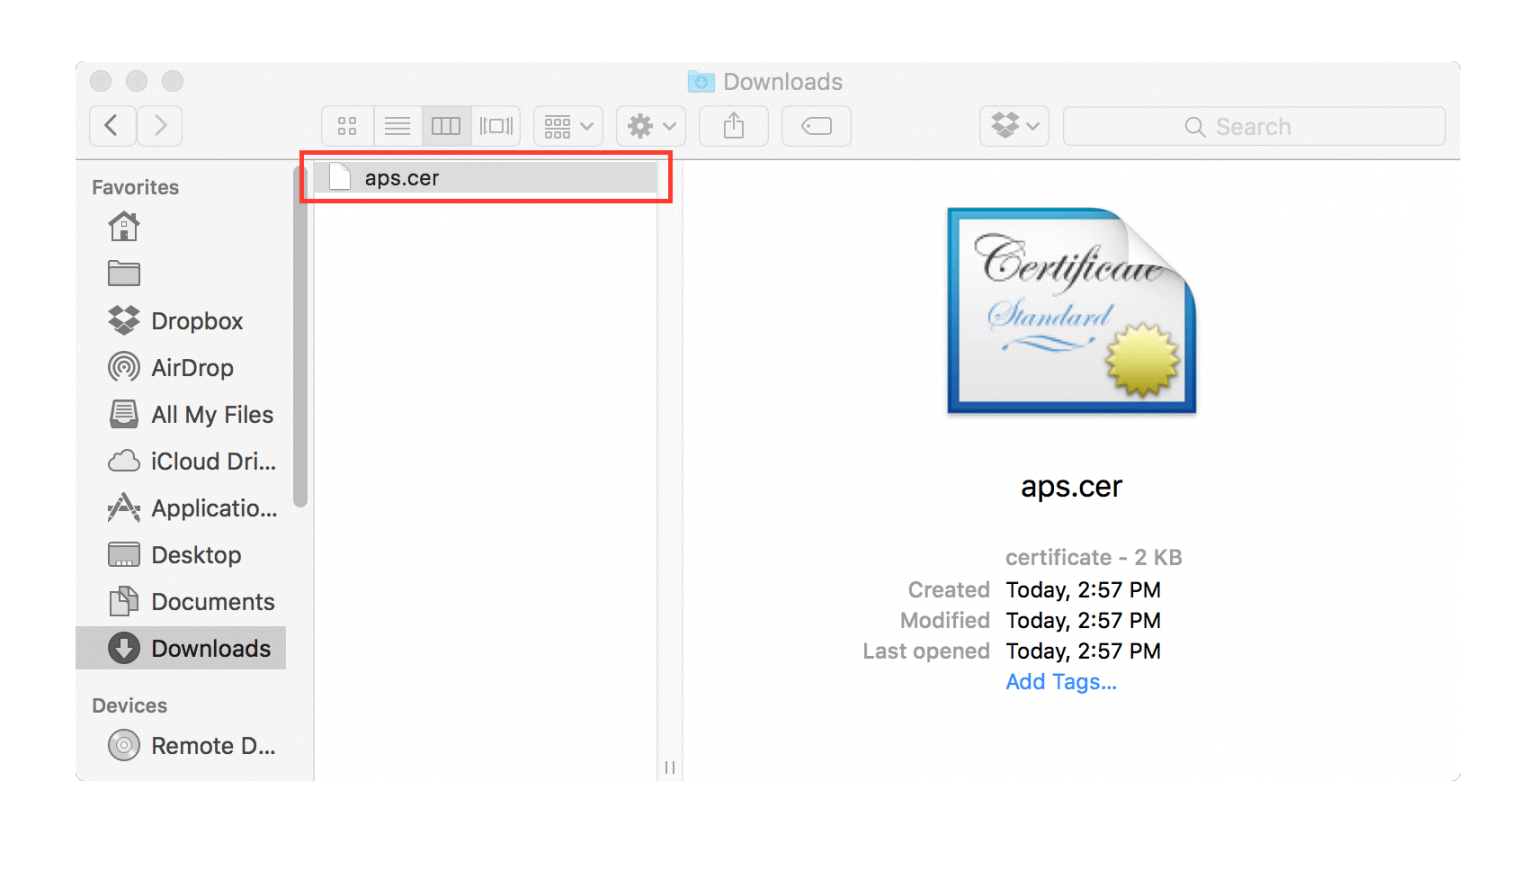
- Open the .cer file you downloaded in the last step
by double clicking on it in Finder.
-
After a few seconds the “Keychain Access” program
should pop up. Select Login > My Certificates, then
right click on your key in the list and select
“Export“.
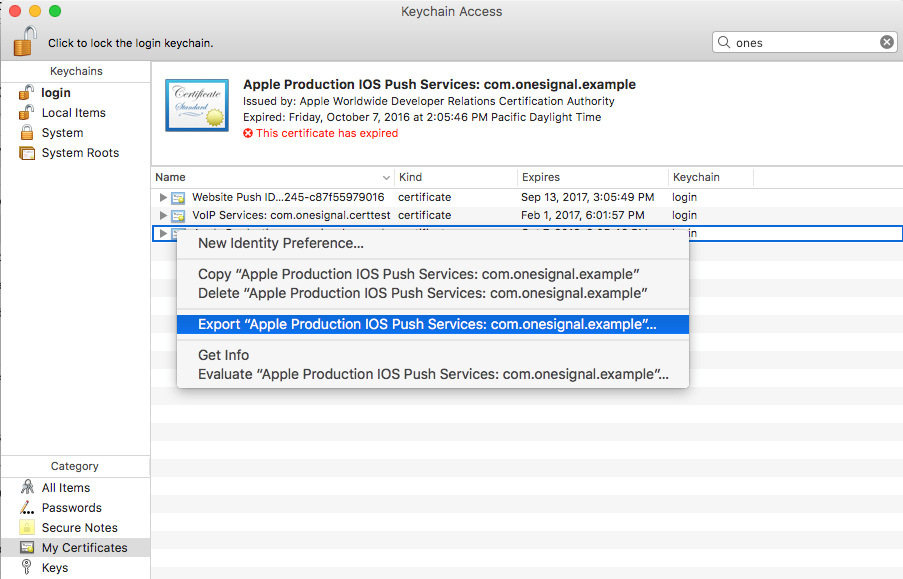
- Give the file a unique name using the .p12 extension, and press save. You will have an option to protect the file with a password. If you add a password, you need to enter this same password on OneSignal.
Upload Your Push
Upload Your Push Certificate to OneSignal.
If you haven’t already, you should set up your OneSignal account.
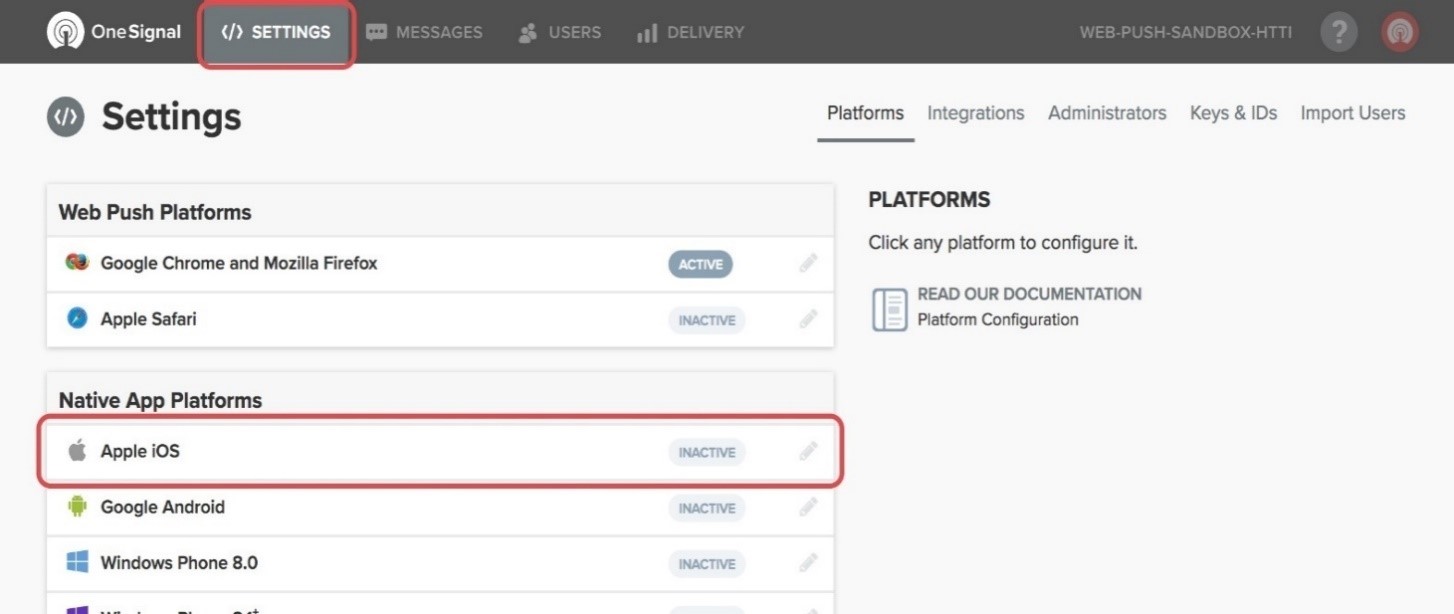
- Select your app from the All Apps page in
OneSignal, then go to “App
Settings” and press “Configure” to the
right of the Apple iOS Settings.
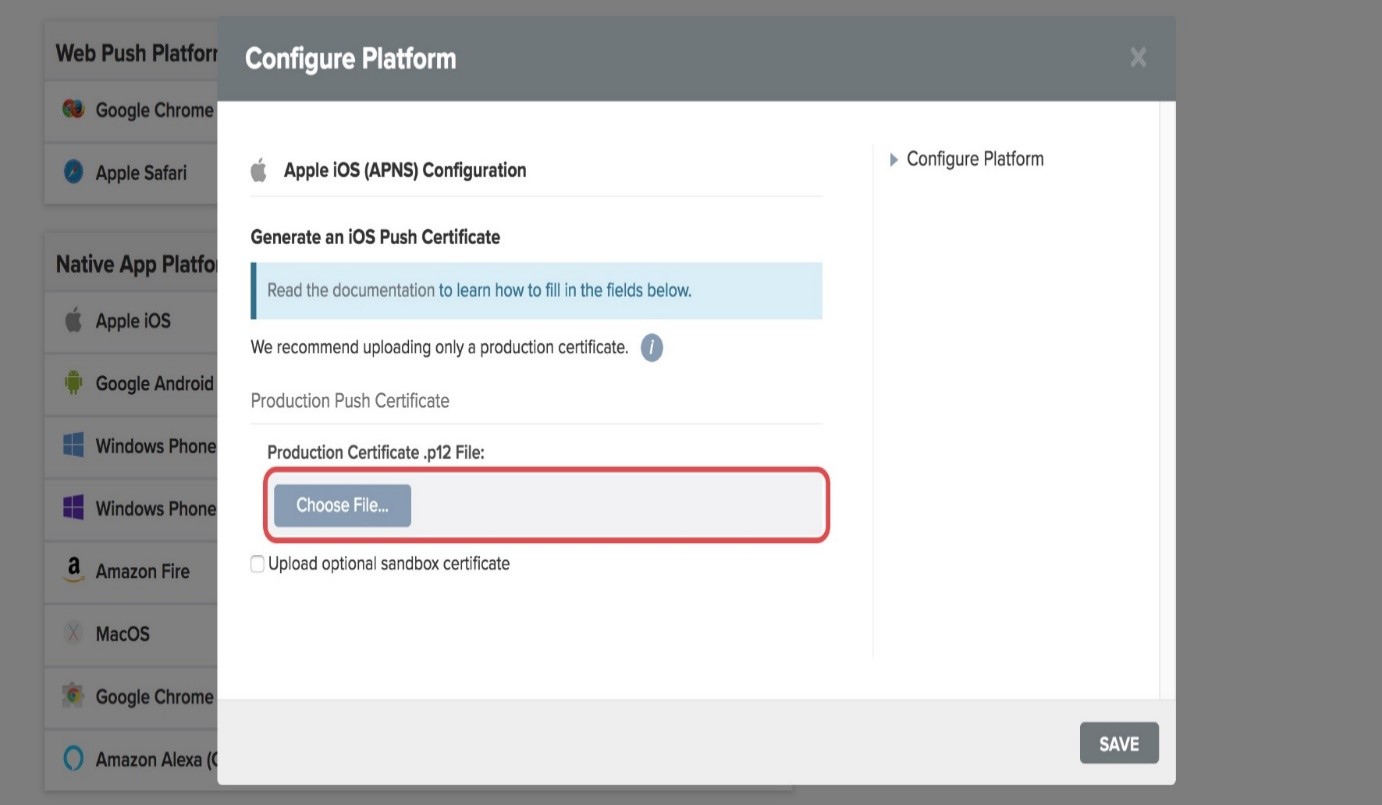
- Select the .p12 you exported along with a password
that you added, and press Save.
General Settings
#back to top

If you want to show the “cancel order” button, select show. While you can also hide it by applying the “hide” option.

From here you can set a certain time duration, prior to which the buyer can cancel the order. For instance, the 8 Hours option implies that order could be cancelled at least 8 hours prior to the agreed delivery time.

This allows you to choose any of Home Screen Style from 8 available styles.

This option allows you to display or hide the “Cart”.

Here you need to place the URL of your business website.

Here you ought to place a specific currency symbol that you deal in.

This option allows you to tag your new arrivals as “New Product” for as many days as you select this option.

This option allows you to place a filter of maximum price so that the products falling within this certain range show on your site page.
Checkout Settings
#back to top
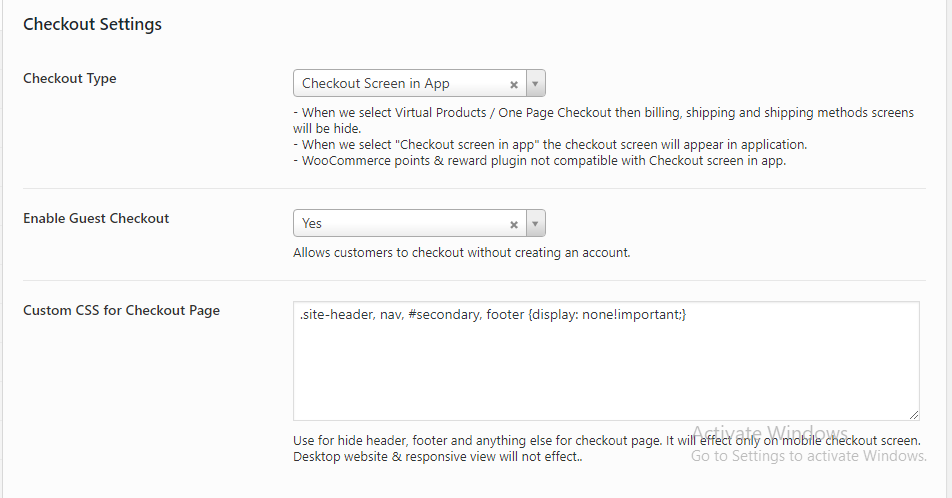
If you want to show the “cancel order” button, select show. While you can also hide it by applying the “hide” option.
a) Checkout Type
In checkout types, there are three further options available.
- Defaultby selecting this option, you allow the web view of checkout. This checkout option appears in your app.
- Virtual This checkout option is meant for those sinesses that deal in virtual or intangible products that cannot be shipped physically, rather just downloaded. For instance, digital products, Pdf files, books, etc. In this checkout style, only the billing detail page appears and not the shipping detail page.
- Screen in Appin this checkout type, a separate order page is created right within the app where billing and shipping details are entered and stored.
b) Guest Checkout.
By enabling this option, you allow a random visitor to place the order without properly registering.
c) Custom CSS for Checkout Page.
This custom CSS allows you to change/modify your checkout page options right in the manner you like.
Contact Page Settings
#back to top
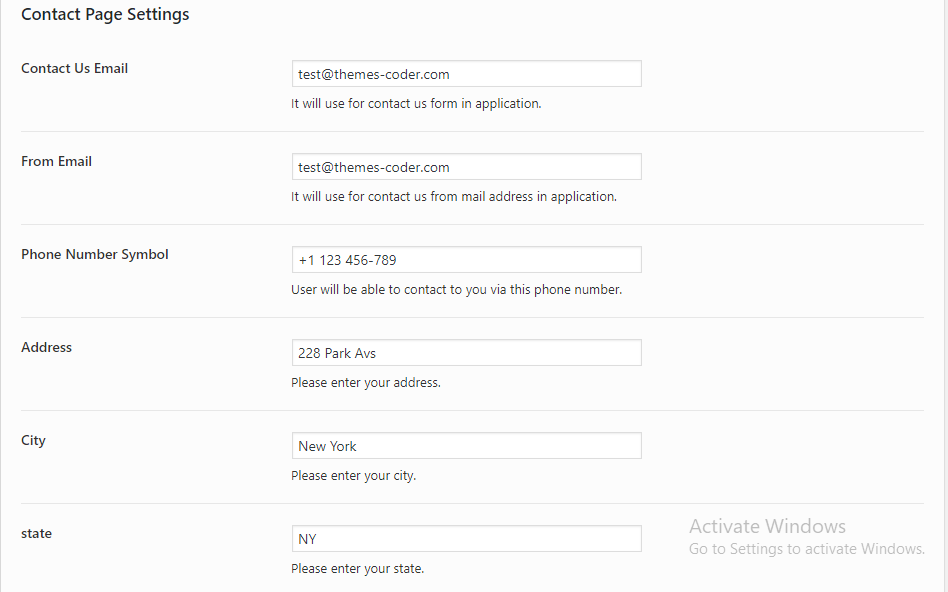
This entire page is designed in order to facilitate the client in contacting you. You are supposed to fill in each column on this page appropriately and accurately. This contact form is a bridge between you and the client.
Sidebar Menu Links
#back to top
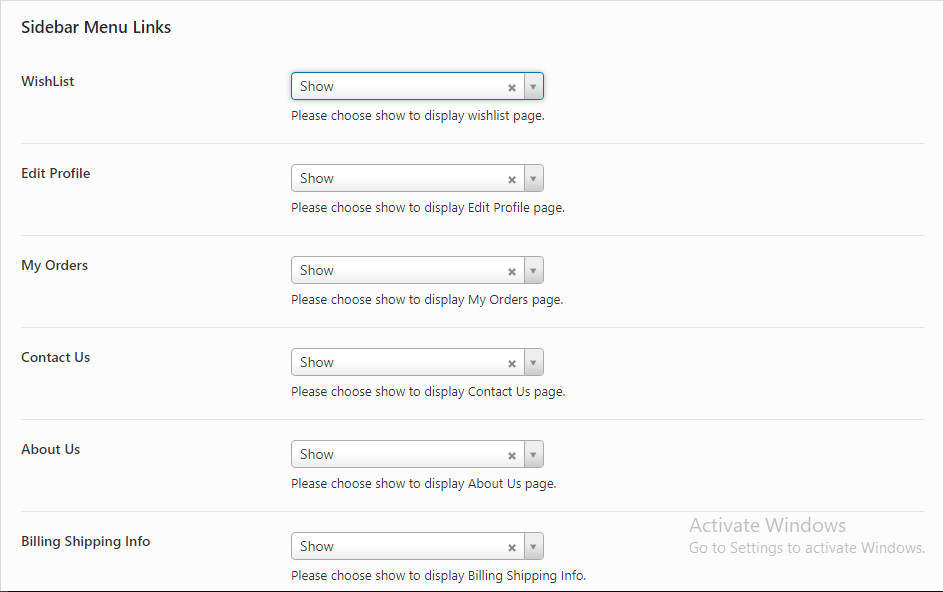
Wishlist
Wishlist is meant for the visitor where he/she can add products that he/she is likely to buy in the future. You can display or hide the wishlist.
Edit Profile.
This is again meant for the visitor to edit his/her profile information that was used in registration. Through this, you can allow or restrict the visitor from editing the profile.
My orders
Through this page, the visitor can see his/her order details and history. You can show or hide this option.
Contact us.
This is the page that carries the details of your contact information. You can show or hide this.
About Us
This is the page that shows the “about us” content. You can show or hide this from this option.
Billing Shipping Info
This segment is meant for the user where he/she can store billing and shipping information. You can show or hide it in the left menu.
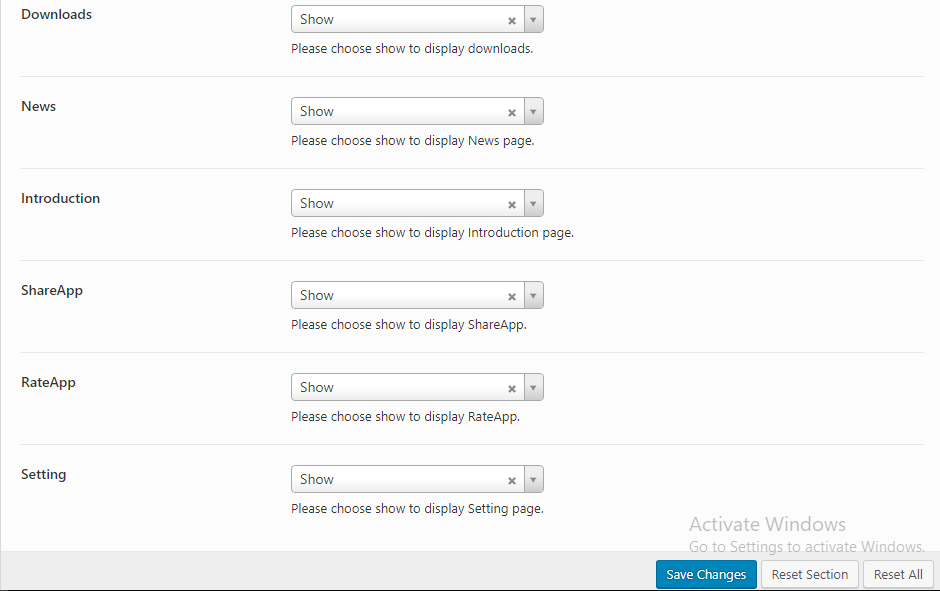
Downloads
This is again meant for the visitor whether he/she wants downloads or not. You can show or hide it in the left menu.
News
This carries the latest news about your business. You can show or hide this from the left menu.
Introduction
This segment contains your business’s introduction. You can show or hide it from here.
Share App
Through this option, the visitor can share your app through different mediums with other users. You can show or hide this option from here.
RateApp
Through this option, the visitor can share your app through different mediums with other users. You can show or hide this option from here.
Wishlist
Through this option, the visitor can rate your app. You can show or hide this option from here.
Settings
Show or hide the settings from the left menu.
App COntent Pages
#back to top
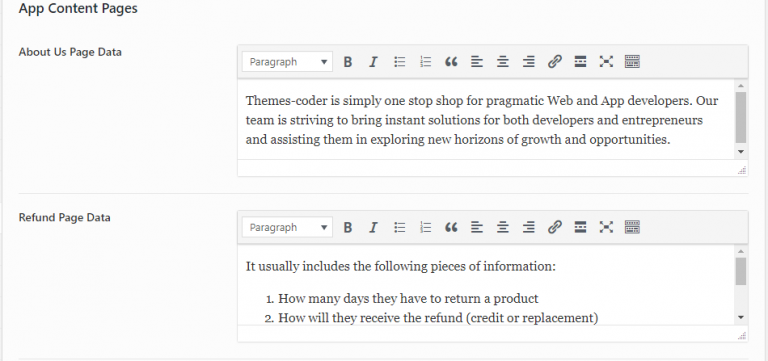
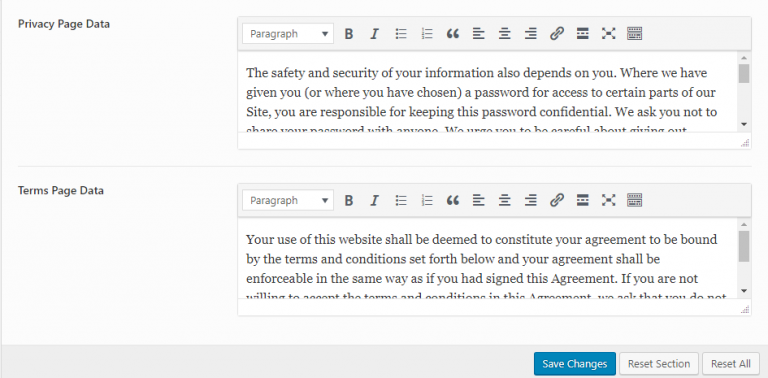
This feature allows you to display different information for the visitor I.e Your About Us page, Refund Policy, Privacy Policy, Terms, and Conditions content.
Build with capacitor
After all configuration and installation compete, you have to build your application with capacitor, you have to use following command for signed apk
First, you have build for web changes with this command
ionic build
Secondly, you have to copy it for android with this command
npx cap copy
Lastly, you have to open android studio for build your signed apk
npx open android
If you face still any problem in build,You can follow this link
https://capacitor.ionicframework.com/docs/getting-started/with-ionic/