Android Laravel Groceries With Deliveryboy 1.3
Introduction
- Item Name : Androidn Laravel Grocery Ecommerce Solution With delivery App
- Item Version : v 1.3
Essentials #back to top
Following are essentials you must have before installation
- Php laravel supported web hosting.
- Java SE Development Kit (JDK)
- Android Studio (IDE)
- Android minimum SDK minSdkVersion 21
- Android API 21(Device with min version 5.0)
- Facebook account to setup facebook login
- Google account to setup google login
- Mail Chimp account to setup Mail Chimp Newletter
- Create firebase account setup
- OneSignal account setup for push notifications
What’s included in the package? #back to top
The package include:
- CMS
- website
- Customer App
- Delivery Boy App
Website(PHP Laravel) Pre Requisites for installation
#back to top
The Laravel framework has a few system requirements. All of these requirements are satisfied by the Laravel Homestead virtual machine, so it’s highly recommended that you use Homestead as your local Laravel development environment.
However, if you are not using Homestead, you will need to make sure your server meets the following requirements:
- PHP >= 7.2.0
- BCMath PHP Extension
- Ctype PHP Extension
- JSON PHP Extension
- Mbstring PHP Extension
- OpenSSL PHP Extension
- PDO PHP Extension
- Tokenizer PHP Extension
- XML PHP Extension
- Allow URL F-Open
- PHP EXIF PHP Extension
You can read more about from official laravel website.
Android Pre Requisites for installation
#back to top
Application build with android studio, so you must have prior experience of native android application development and app deployment to store.
Java SE Development Kit (JDK)
Android Studio (IDE)
Android minSdkVersion 21
Android Device with min version 5.0
Source Code Setup
#back to top
From Where to Begin?
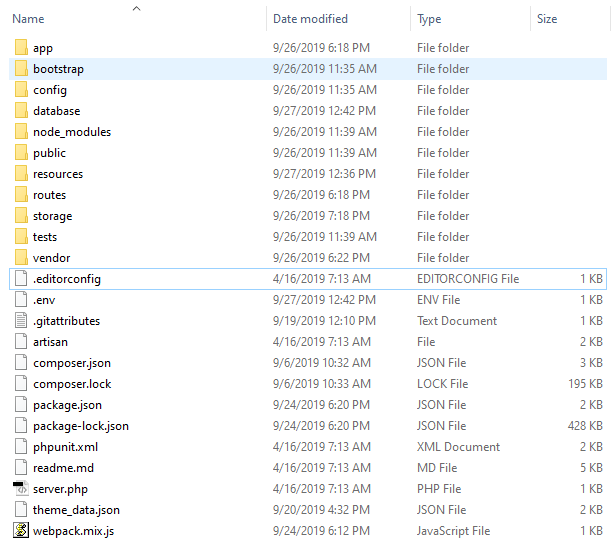
Well, after reaching the above-mentioned step, you need to begin with the website_adminpanel.zip folder. Copy this folder as it is, and paste it in some other dedicated drive and folder and extract the files from the website_adminpanel.zip folder. The extracted files would appear as shown below
Now you just need to enter your website domain name/public/install in any browser, as shown below, and an installation wizard would automatically pop up on the screen.
To make the installation process smooth and user friendly, we have come up with a bit more innovative manner of installation where the user would be provided with an installation wizard, user would be required to keep putting the appropriate values in the relevant fields and the installation process would not take more than just a couple of minutes.
After uploading the source code, once we click it, this would open up by default an installation wizard that would look like this,
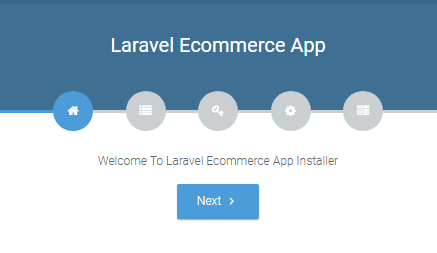
The above-given slide with Laravel Ecommerce App title is a welcome note to the user. By clicking on the Next button, the wizard would appear like this
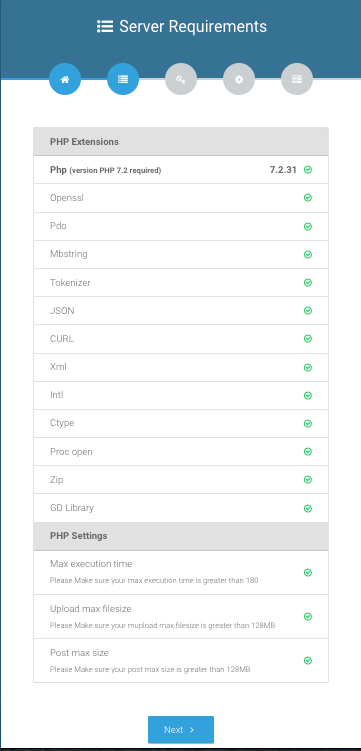
The above mentioned are the dependencies or extensions for the server that are essential components for installation. All the green checks would ensure the presence of all the above mentioned dependencies. In case, if the system doesn’t have any of these dependencies already installed, a red cross mark would appear in the corresponding column of the missing component. So make sure to install all the dependencies and extensions to ensure the smooth running and installation of the app.
By clicking the next, the wizard would ask for the permissions as shown below.
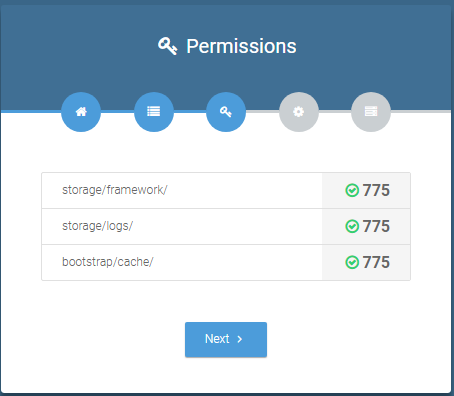
You need to grant the directed permissions respectively for instance.
Storage/framework/ 775
Storage/logos/ 775
Bootstrap/cache/ 775
To grant these permissions>
Open your C panel, here you will find three folders in horizontal order named as
App
Framework
Logs
Select the framework and logs folder, right-click on this, and now click on the change permission, enter the relevant vale 775, and click on the change permission on the bottom again.
In the same manner, grant permission to the bootstrap/cache folder by right-clicking on the folder and selecting change permission.
Once all the permissions are granted, all three folders would show a green checkmark on correspondent columns. From here click the next button.
In the next step, you need to complete the environment settings wizard.
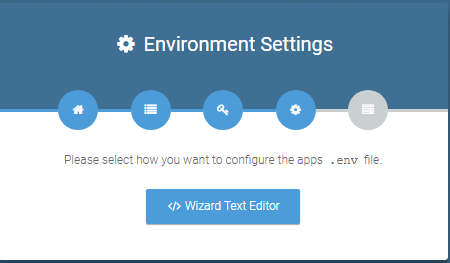
By clicking the Wizard Text Editor next slide will show up as given below
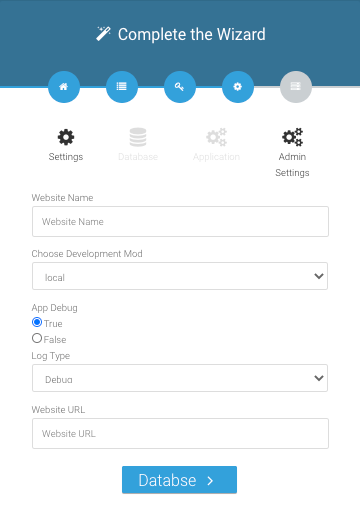
Step 1) Give any name to your Website as you like for instance, Laravel 1 or XYZ.
Step 2) From development mode that carries the following option(s)
Local
Select any of the above mode(s) according to your requirement.
Step 3) In App Debugging section, there are two further options that are
1) True
2) False.
By clicking the true, all the errors would be shown
By clicking the false, no errors would be shown.
Step 4) In Log Type section select debug.
Step 5) In Website URL section, paste your app’s URL and click on the database on the bottom of the wizard.
In the next wizard section, you will be required to enter your database information.
Note: In any case, if you need to change your .env settings or need to change the production or any other mode, you can go to the link below and alter your settings as required. But first complete all the requirements of this wizard.
http://yourdomain/admin/setting
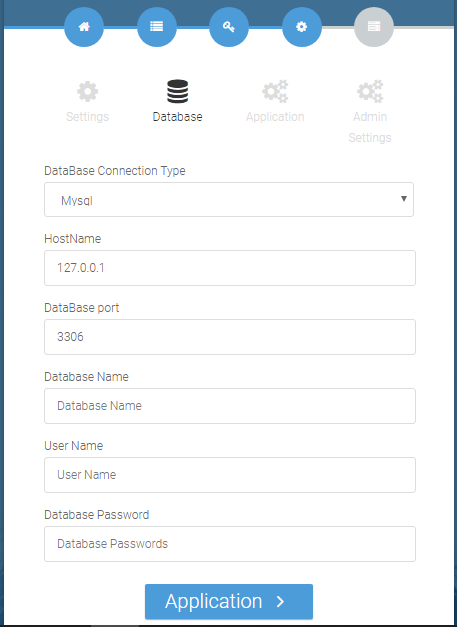
To begin with this, you need to create an empty database first in your PHPMyAdmin, enter all of the details of that empty database in the above wizard, and click on the application on the bottom of the wizard.
Note: Your predefined and created database MUST be empty.
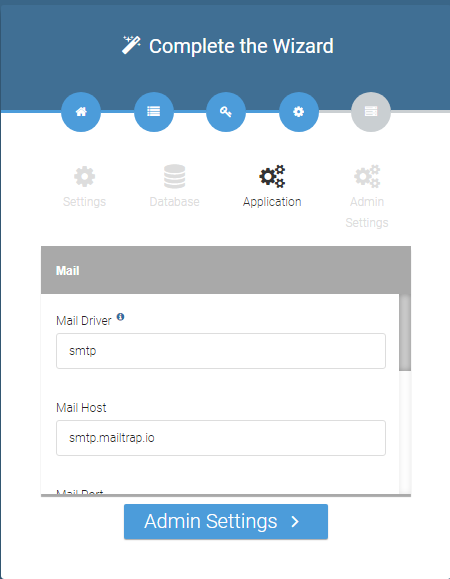
Make sure to also configure your mail settings in the wizard shown above.
In the final phase, enter your admin details like
Purchase Code
User Name
First Name
Last Name
Email
Password

Your website will be live on following link.
By default laravel website run from public folder, so you need to change your server/domain document root to public. You can follow below link for it. There are different methods of remove public from url.
Remove the Public from URL in Laravel
INSTALLATION WARNING!
We have different environment in development.
- Xamp
- Lamp
- Wamp
- (Live server) Cpanel
- Others
Our laravel installer works perfect on every environment, However some exceptions may occur on environment to environment change .
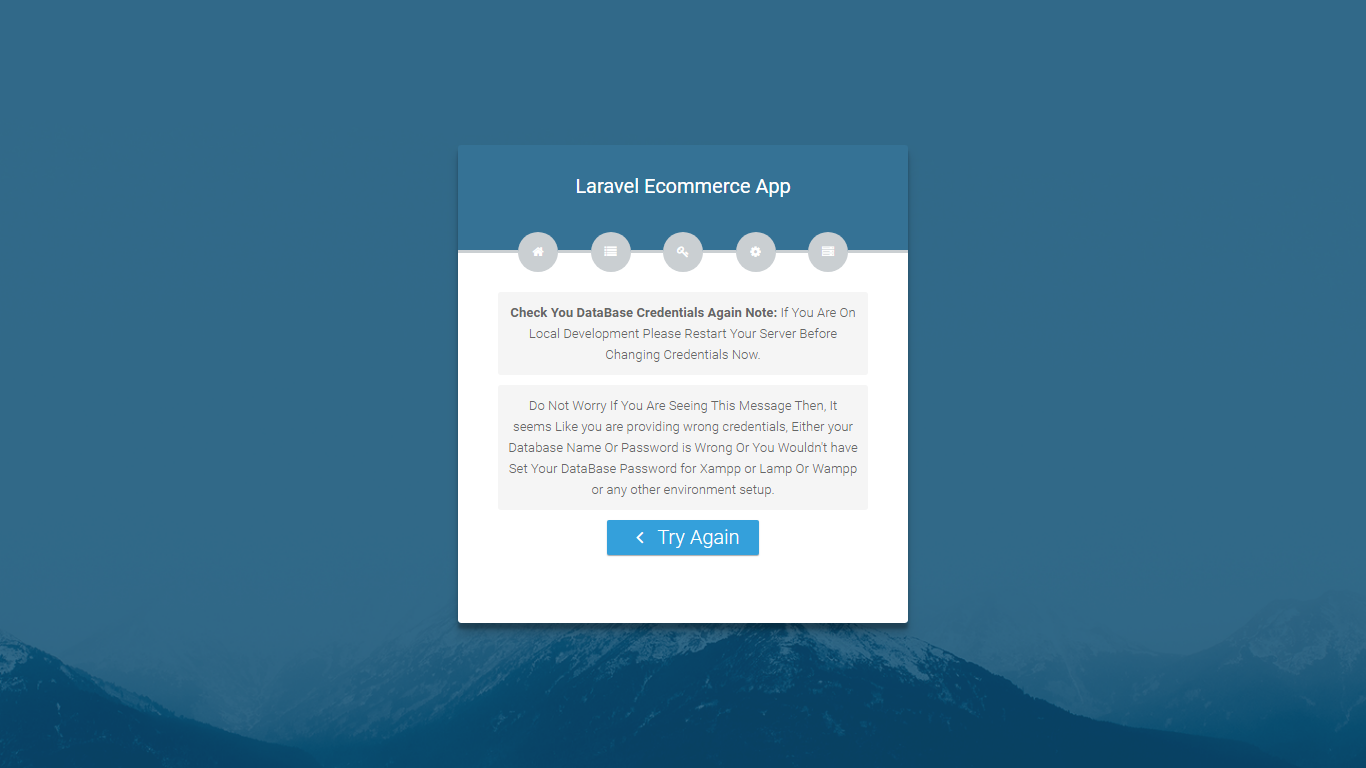
For Example
Sometime user provide wrong credentials for database, which gives an exception. our laravel installer is handling this exception in a way, It shows message to user to restart its local server if user is providing wrong credentials once.
Note: user is deploying project on local environment like on Xamp , Wamp , Lamp etc”
But if user on live server then user should may/may not clear cache.
if user face session expire (it occurs due to providing wrong credentials many time.) page after providing wrong credentials on live server , user should must clean cache on live server.
Facebook Login
#back to top
This allows you to log in through your Facebook credentials. Here is the official link with the detailed demonstration of Facebook integration
https://developers.facebook.com/docs/apps/
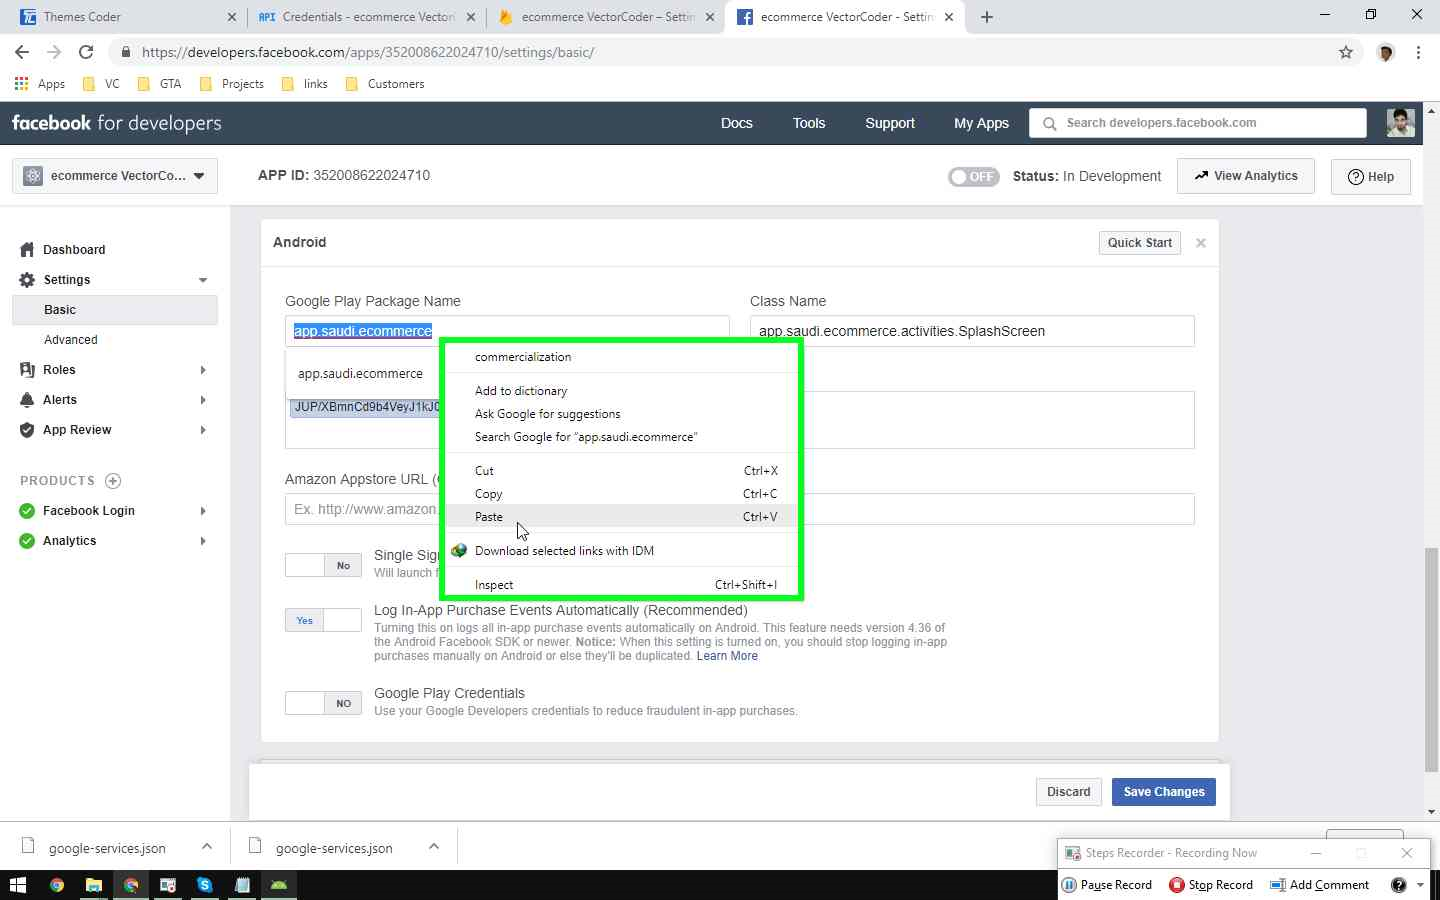
After that you need to enable Facebook login and also need to put Facebook app id , secret id , Facebook app URL, to complete Facebook login process.
To enter your Facebook Credentials use below link.
Google Login
#back to top
This allows you to login through your Google credentials. Here is the official link with the detailed google integration.
https://developers.google.com/identity/sign-in/web/sign-in
After that you need to enable Login from back end and also put the Google app Id , Google app secret and google app URL to complete google login process.
To enter your Google Credentials use below link.
Onesignal
#back to top
You need Firebase account and onesignal account for documentation you can get information from link below.
https://documentation.onesignal.com/docs
https://firebase.google.com/docs
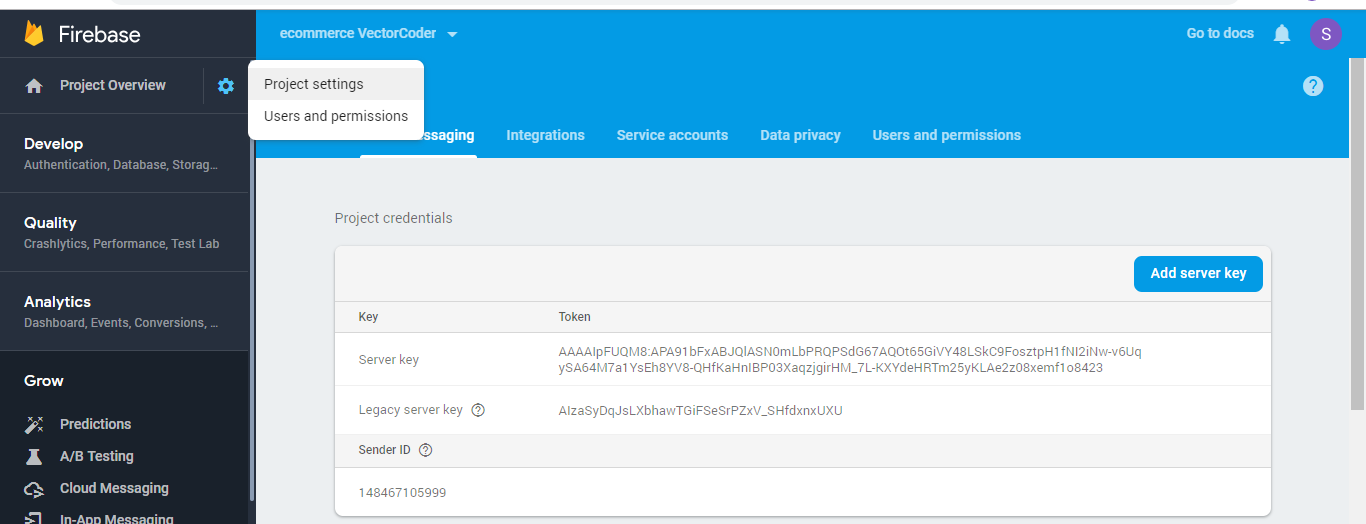
First of all you need to create a project on FCM then add Firebase to your
account to get sender ID using URL below
https://console.firebase.google.com/project/_/settings/cloudmessaging/
You can get sender ID after that you can create app on one signal to get App ID using link below
Now avail this feature, put both app ID and Sender ID at back-end make this feature functional.
To enter your Onesignal Credentials use below link.
Mail Chimp For Newsletter
#back to top
This allows you to Subscribe Newsletter for customers. Here is the official link with the detailed Mailchimp integration.
https://login.mailchimp.com/signup/
Step 1) Login to your MailChimp account. Under the user drop-down, select the
Account.
Step 2) Click on Extra->API keys.
Step 3) Under the Your API keys section, click on Create A Key and copy your API key
which you need in a moment.
Step 4) Now you have our API key ready.
Step 5) After that you need to enable Newsletter from back end and also put the
Mailchimp API and Mailchimp Audience ID to complete MailChimp subscription
process.
You can get MailChimp Audience ID from below link
https://mailchimp.com/help/find-audience-id/
To enter your MailChimp Credentials use below link.
Import App into Android Studio
#back to top
After CMS installation, please follow below given instructions to set up your mobile application..
4.1) – Getting Started
Download and install all latest tools, required for developing Android apps such as Java Development
Kit and Android Studio as the Official
Android IDE. For updated tutorial about how to install them, you can see and Download this from Android
Developer website.
Download
JDK
Download Android studio IDE
4.2) – Android Studio Setting
There are three main things interacting when you use Android Studio to create android applications.
· The code you write in Java or Kotlin to create interactive android apps
· Android Studio itself, an IDE that provides you with a nice interface for coding
· Android SDK, a selection of tools including the Android platform itself
Now you can click on Android Studio to launch it. Once it opens up, you’ll be presented with a menu where you’ll be able to get started or configure some options. The great thing is that everything is handled for you at this point, though you may want to familiarize yourself with the SDK Manager (Configure > SDK Manager) which is where you’ll update your Android SDK to support newer versions, as well as download things like code samples or support for Google Glass. But don’t worry about that now but if Android Studio says you’re missing something, this is where you’ll probably need to go to find it.
4.3) – Open up Project in Android Studio
Locate your Android app in the given project .zip folder and extract it somewhere in your computer.

Once Android studio ready, click open an existing android studio project.
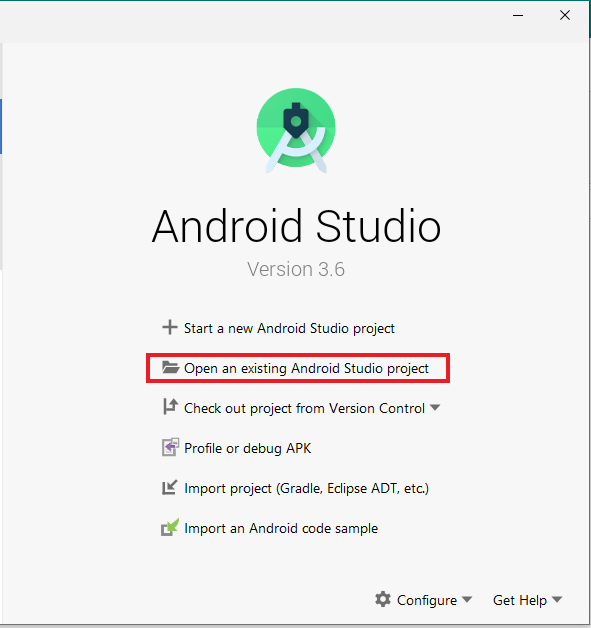
Browse to directory where you placed the android project and click OK after selecting the root directory of project.
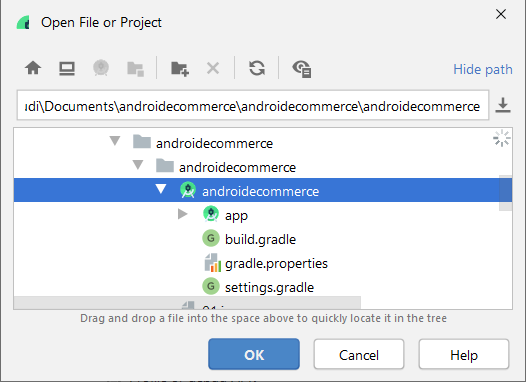
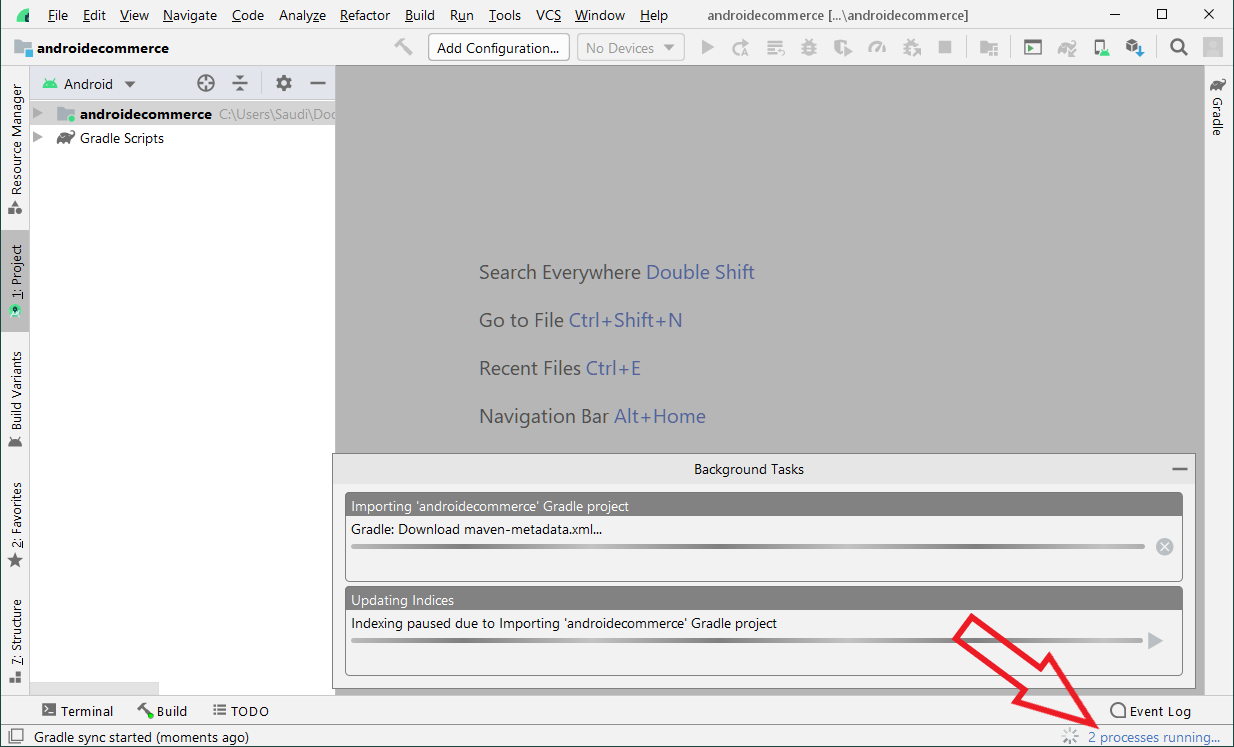
While opening up the project you will get a popup like this. please click OK to building the project.
.png)
After this android studio will download some of the packages and execute some gradle plugins into your project.
Note: This may take some time to compile.
While importing your android app you may get some dependencies errors. to resolve that you just need to update versions of libraries or dependencies.
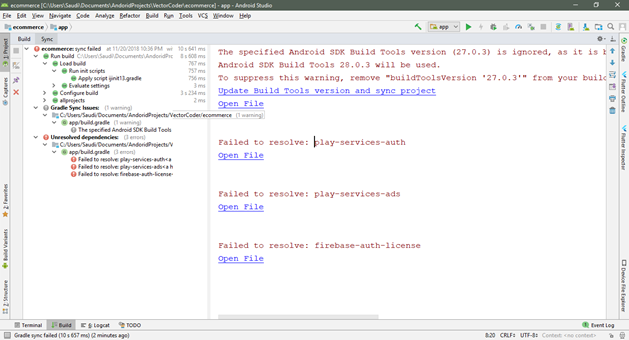
After every thing is done. your android studio project will look like this. you may ignore the plugin update if it recommends that.
Note: if you want to update your gradle plugin that may need to change some deep source code. It is better to user the same version of plugin.
Note: Your Android Version should be minimum 4.0.0. Updating Android Studio may take few minutes.
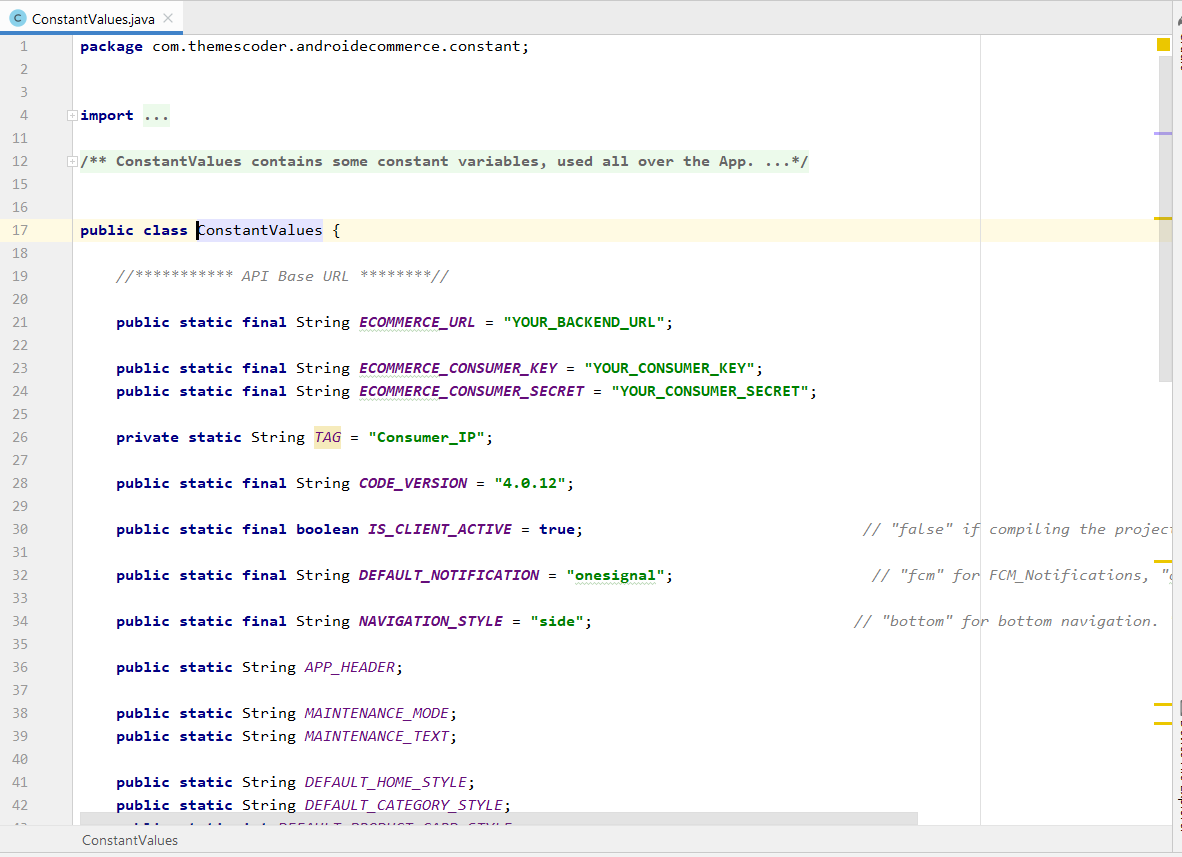
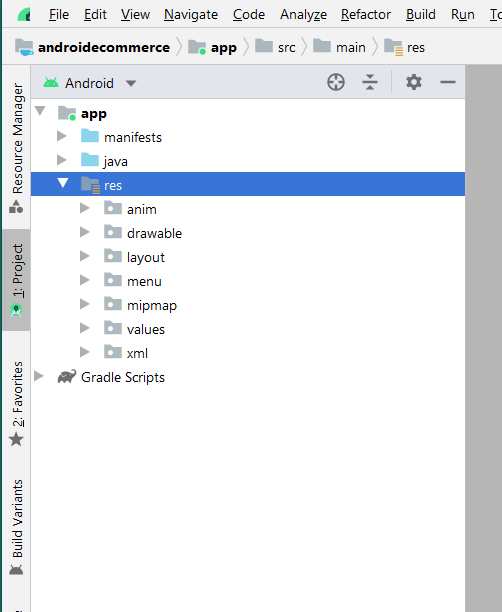
Project directory structure looks like this. your all java source code is placed under the following package.
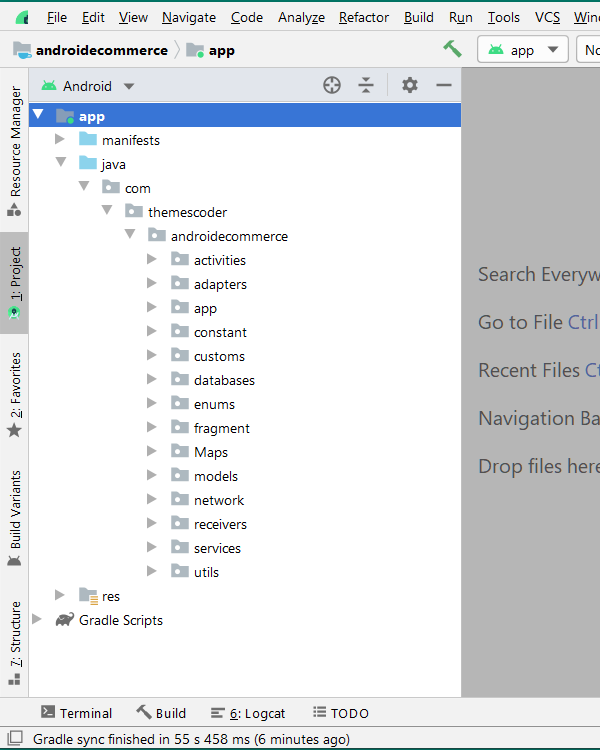
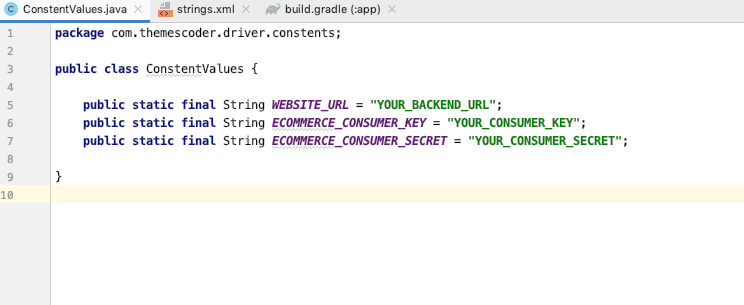
we only need ConstantValues.java file to attach our backend.
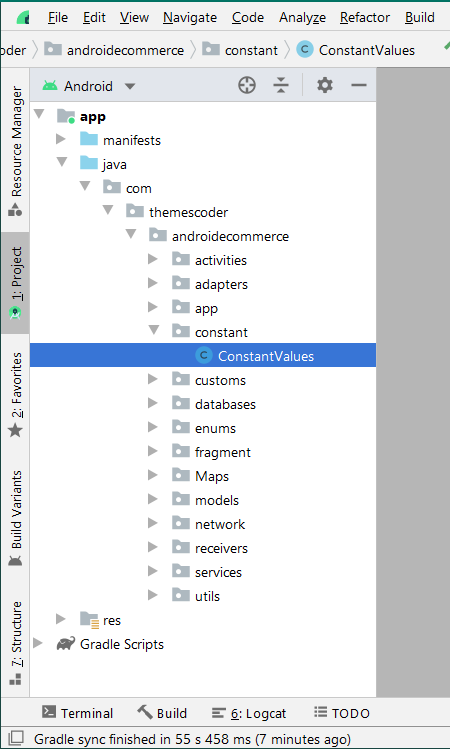
ConstantValues file looks like this.
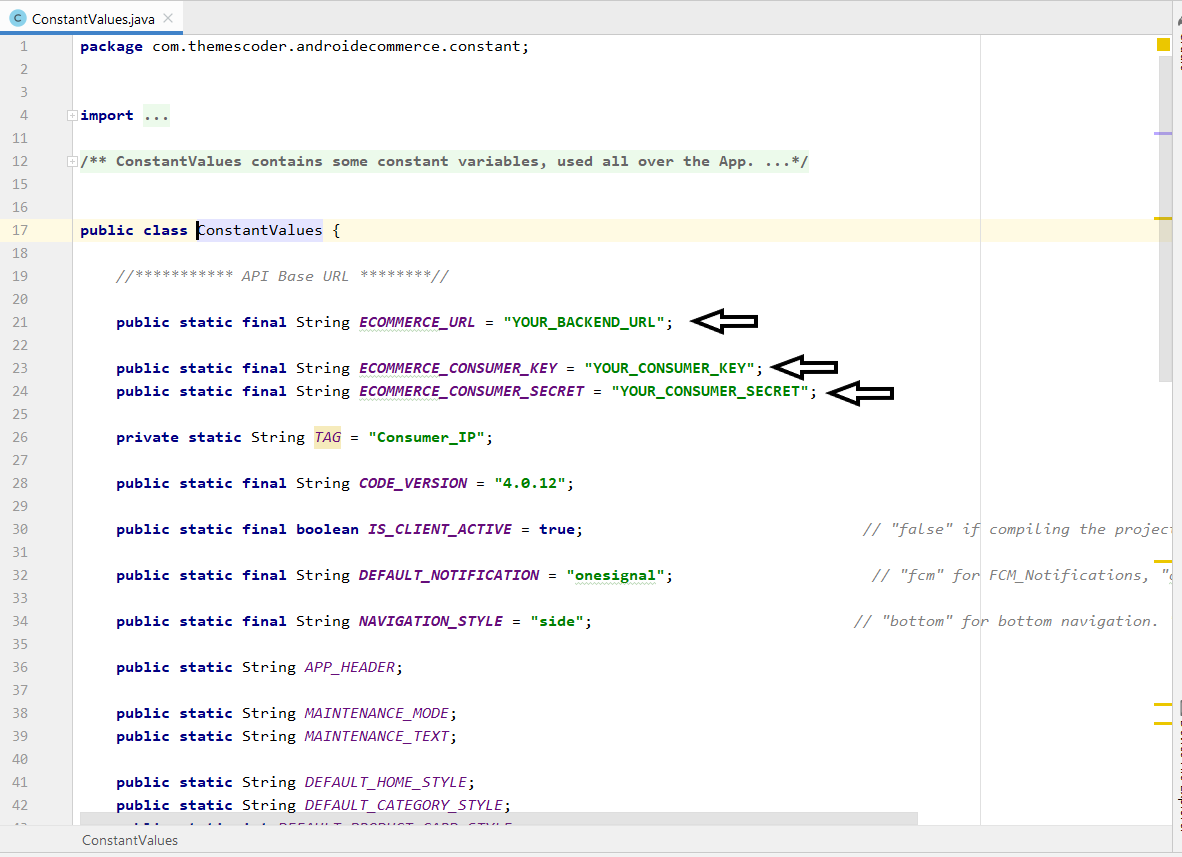
Setting Consumer Key & Secret Key
#back to top
· Go to Admin Panel > Settings(Application) > Application API
· Click Generate to create your Consumer Key and Consumer Secret.
· Copy your Consumer Key and Consumer Secret.
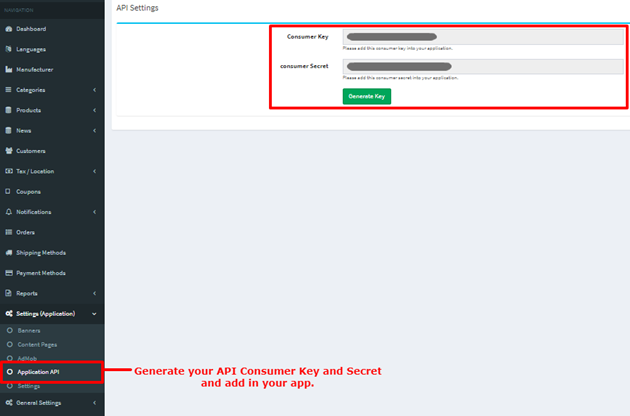
· Open ConstantValues in android studio app
· Place your Backend URL, Consumer Key and Consumer Secret
here.
Some Customization in Constants file
You can customize the following things from the ConstantValues file.

CODE_VERSION variable represents the code version of the android application.
IS_CLIENT_ACTIVE is a boolean varaible toggle the demo feature. i.e. if it is false, app will
show all the home pages and categories in the app menu.
DEFAULT_NOTIFICATION variable toggle in the cloud notification sdk. there are two sdk's which are
integrated in the application OneSignal and Firebase cloud messaging.
NAVIGATION_STYLE variable represents the navigation style in the application. we have
been implemented two style of navigation which are Bottom Navigation and Side Navigation.
Facebook Integration
#back to top
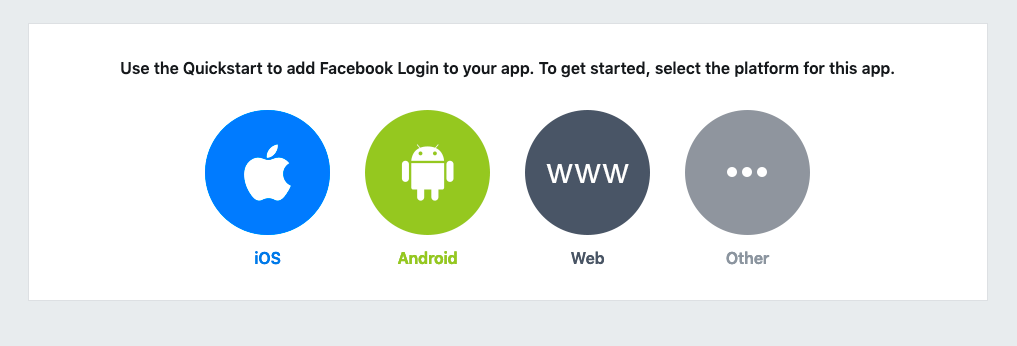
https://developers.facebook.com/quickstarts/?platform=android
This link will take you to the Facebook Developer Console. After login with your Facebook account you will get a screen mention below.
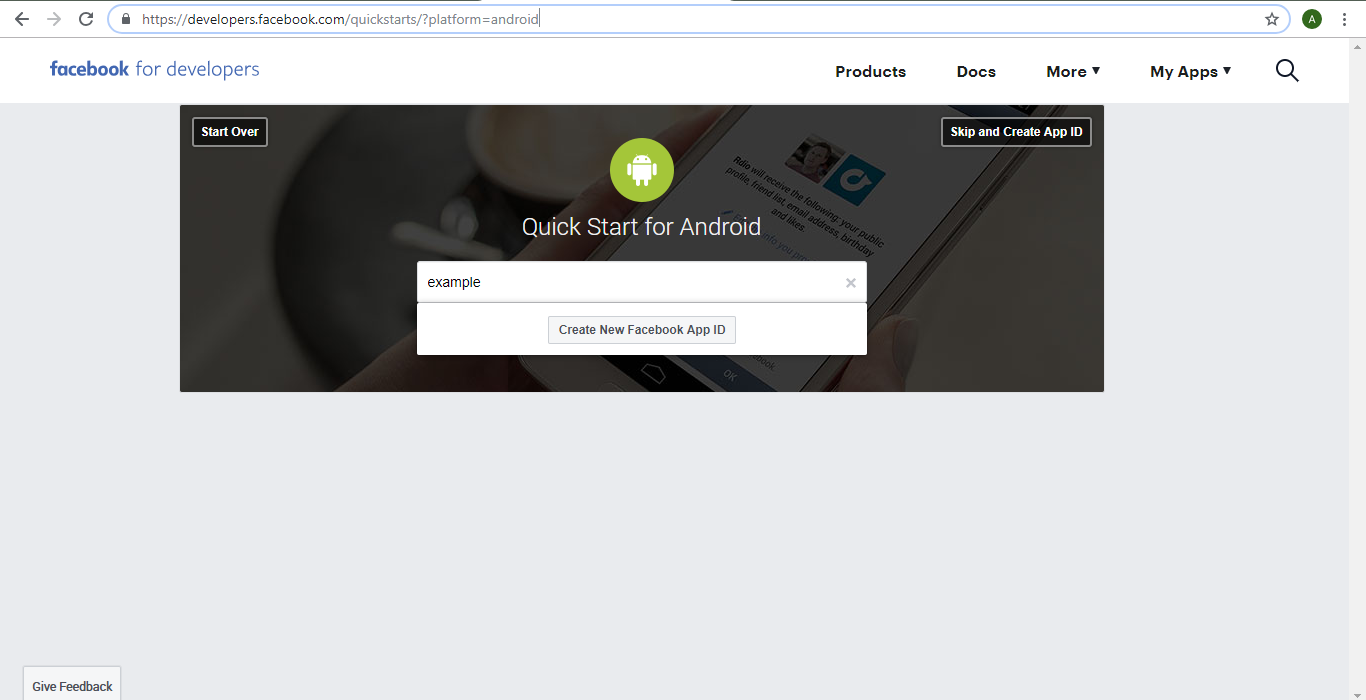
Enter your project name into the Edit Text Field and click Create New Facebook App ID. You will get a screen like this.
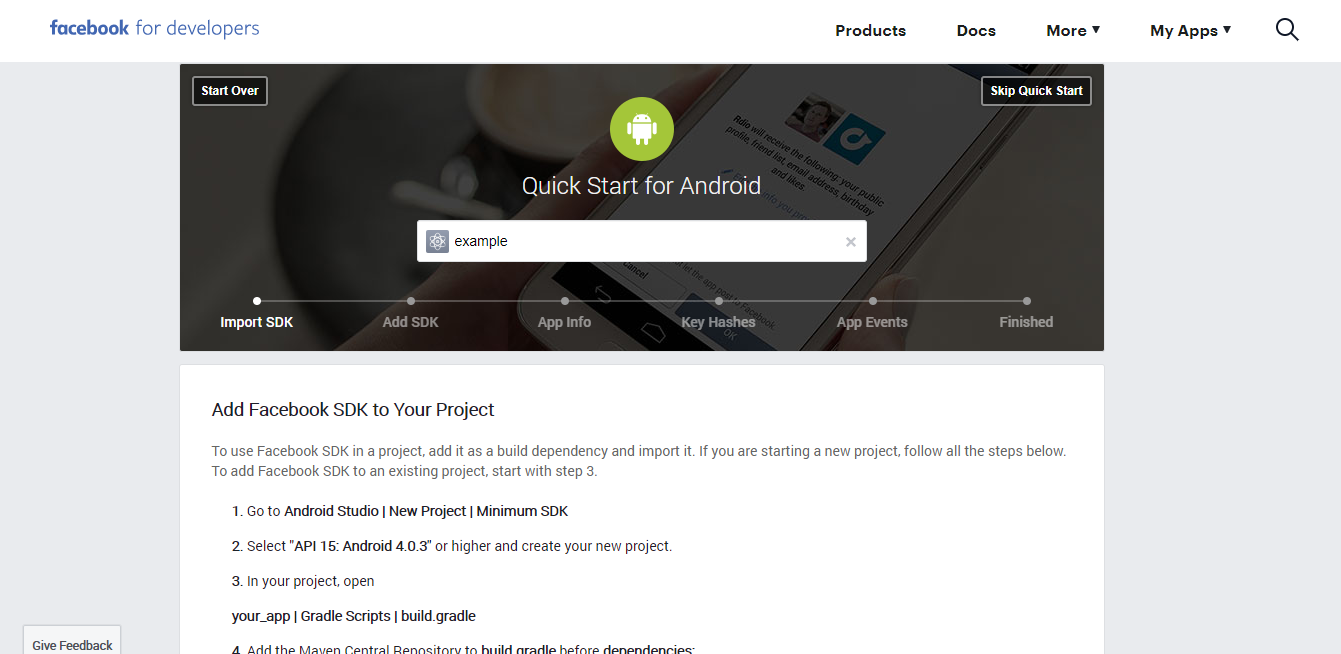
Skip that Import SDK Step and jump to Add SDK and copy that Facebook app ID and keep it safe.
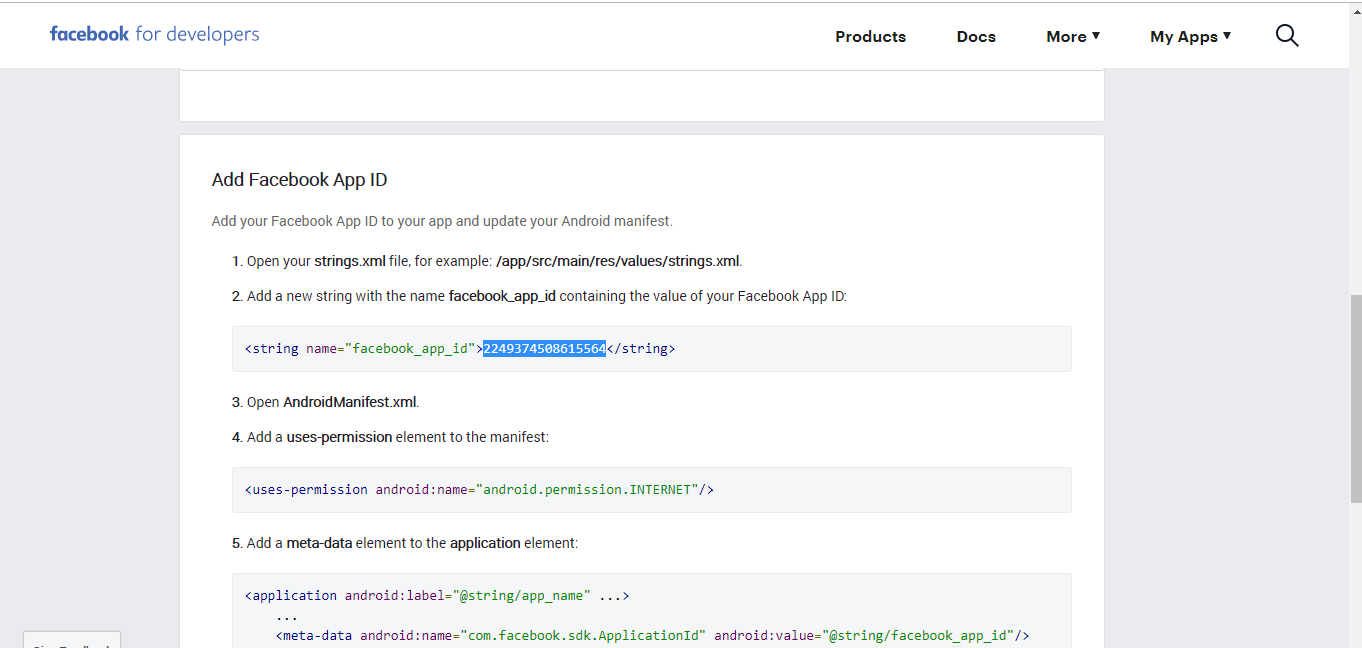
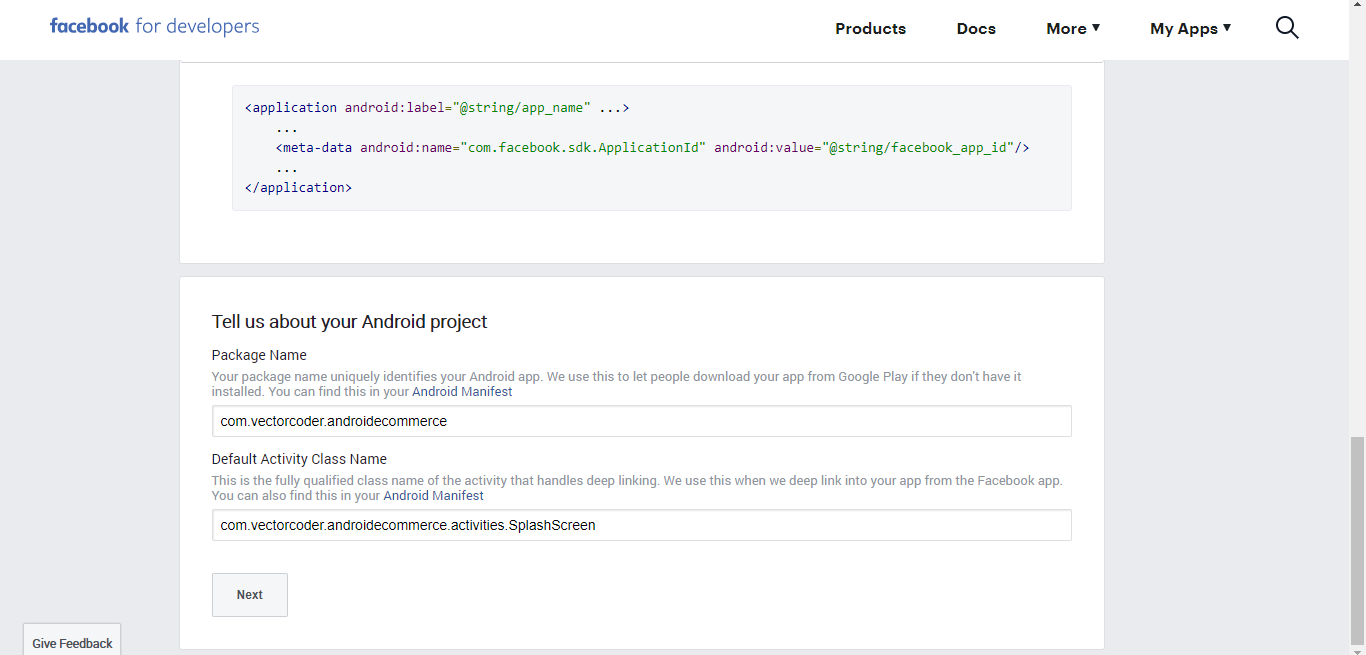
In the Android Project section paste your application package name in package name text field and your (application package name)+.activities.SplashScreen in you Default Activity Class Name text field and click Next.
In the next step you need to generate a key hash. Keep in mind there are two methods for generating the developmental key hash and release key hash.
Key Hash For Windows
In order to generate the key hash first you need to download the OpenSSL(for windows) tool. To download that for windows go to this link below.
https://code.google.com/archive/p/openssl-for-windows/downloads
Download OpenSSL tool compatible with your system and extract it to C:\OpenSSL.
Next you need to find the path of debug.keystore file in the C drive usually it is placed in
the C:\Users\YOUR_NAME\.android folder.
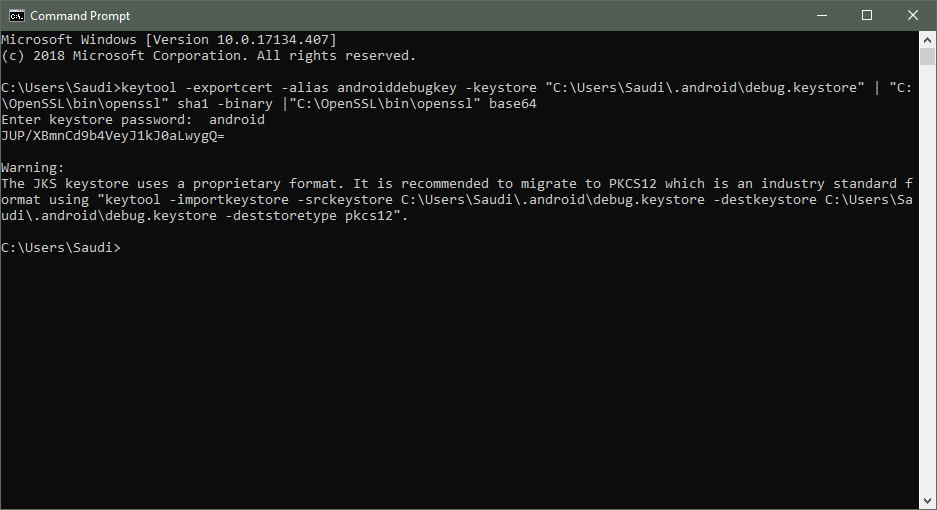
Now open the Command Prompt. and execute the following command.
Note: For Debugging (use it for development purpose only.)
keytool -exportcert -alias androiddebugkey -keystore “C:\Users\YOUR_NAME\.android\debug.keystore” |
“C:\OpenSSL\bin\openssl” sha1 -binary |”C:\OpenSSL\bin\openssl” base64
Note:For Publishing use this command
keytool -exportcert -alias “aliasName” -keystore “keystoreFilePath” | openssl sha1 -binary | openssl base64M
Note:
remember to change the path to you debug.keystore file. and make it sure to use the OpenSSL folder name same as
you created in the C drive.
when you press enter this will get a password. If you do not create a new password, then default password will
be android
Key Hash For Mac
Please follow below mention steps to get hash key for mac OS
First open a terminal (open a command prompt in windows).
Navigate in the terminal to the directory where your Android debug.keystore is stored. Mostly it will located under /Users/user_name/.android/
Once you are in the “.android” directory, run the following command. keytool -exportcert -alias androiddebugkey -keystore debug.keystore | openssl sha1 -binary | openssl base64
When it prompts you for a password, type android and hit Enter
Copy the value printed in the terminal that ends with an = and paste it in the Key Hash field in Facebook. Then click the Save Changes button.
This is your key hash save it to your file and use it in developer Facebook console.
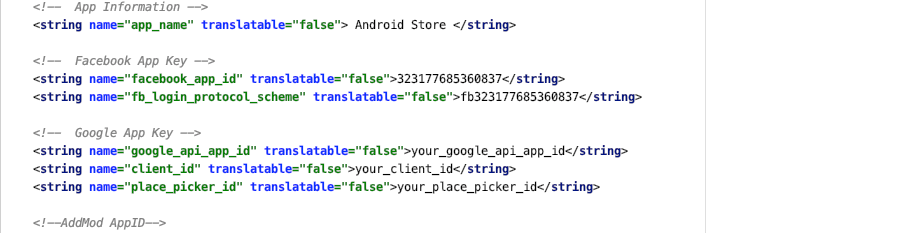
Now paste the application key to the android studio project file shown below as facebook_app_id. (res >
values > strings.xml)
Now to get fb_login_protocol_scheme first go to your facebook app settings and in facebook login section select Quickstart and then select android
In the Edit Your Resource and Manifest section you can get fb_login_protocol_scheme. Just copy and save it.
Google Integration
#back to top
Official link of google login for Android
https://developers.google.com/identity/sign-in/android/start-integrating
Official link of google Map APi for Android
https://developers.google.com/maps/documentation/android-sdk/intro
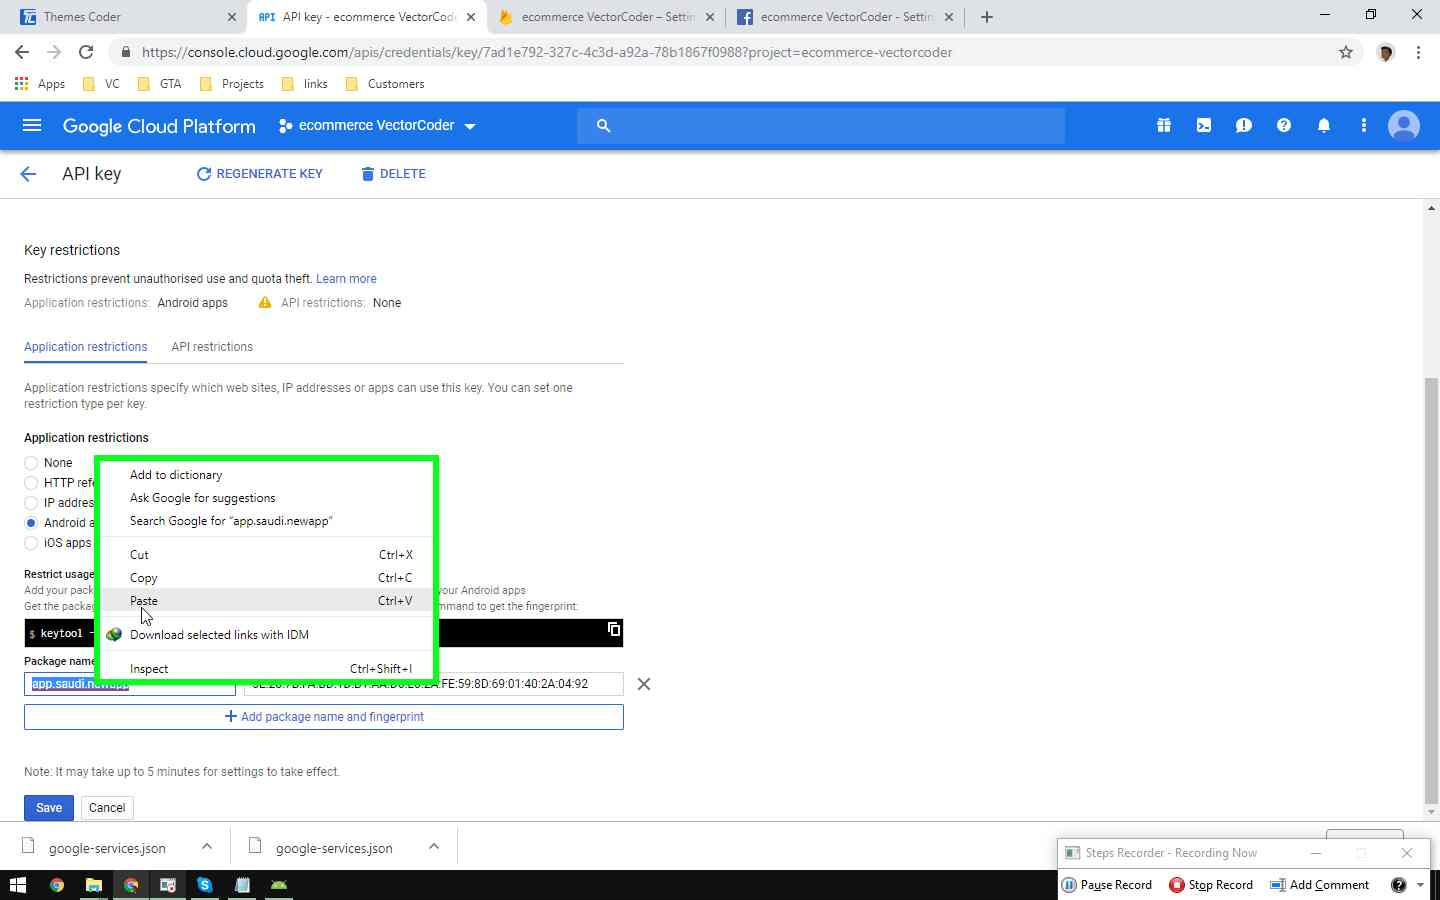
You need two key
- GOOGLE API KEY
- GOOGLE CLIENT ID
Add these key in below screen shot from prject
File path is app/java/com.tehemescoder.androidstore/constant/constantValues
Rename Package(Optional)
#back to top
Lets Say you want to change the android app package name from com.xyz.something to
the com.xyz.newapp. to do that follow the steps given below.
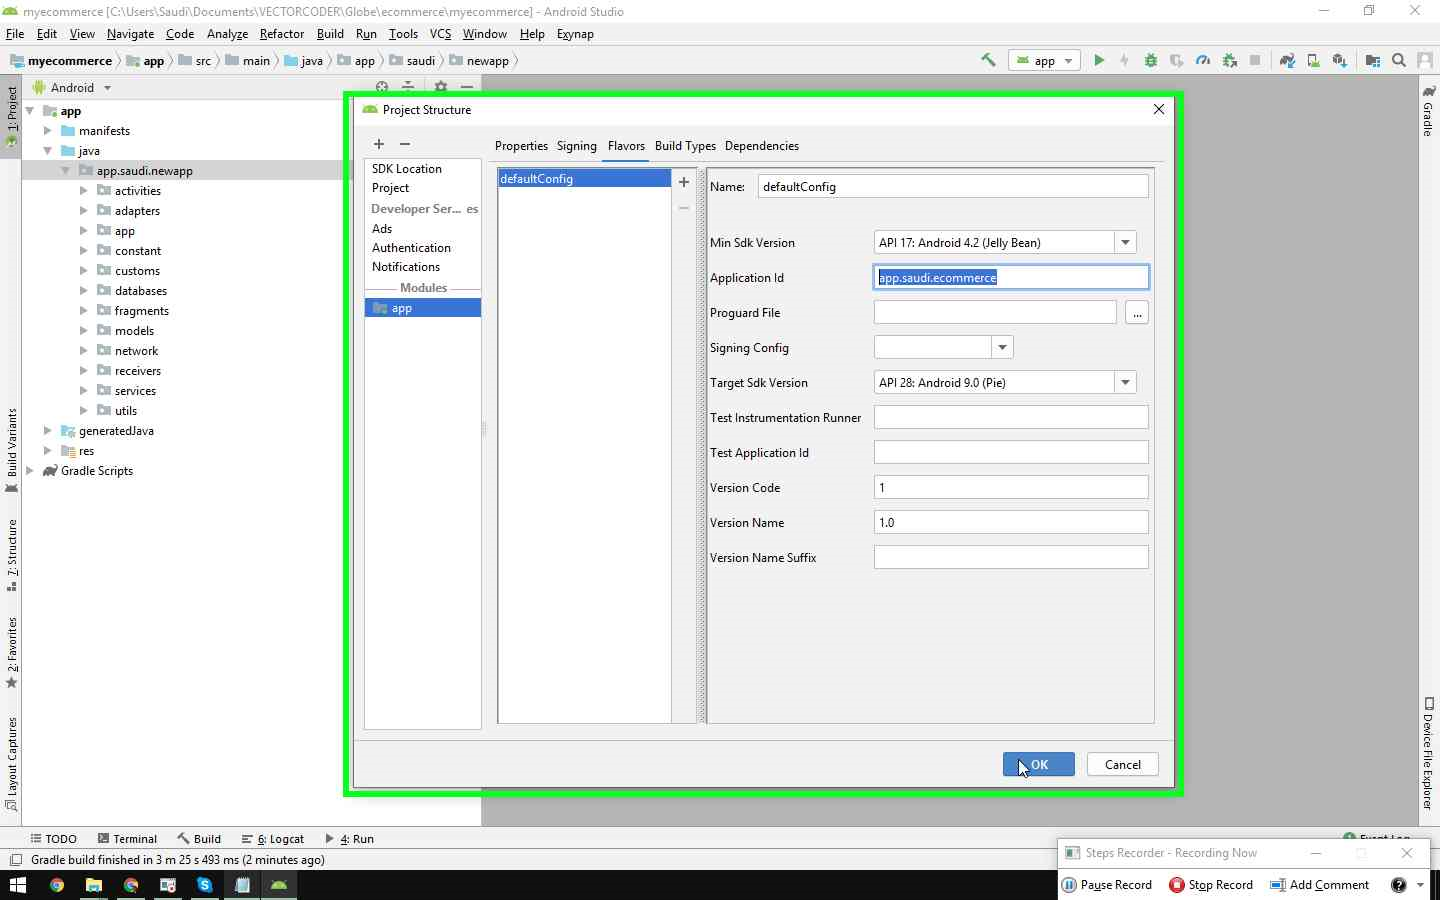
⦁ First open the Project Structure window in the android studio project by
pressing CTR+ALT+SHIFT+S and under the app -> Flavour tab change
the application id to the new application package name and hit OK
⦁ Next go to the AndroidMenifest.xml file and change the application package name to the new one.
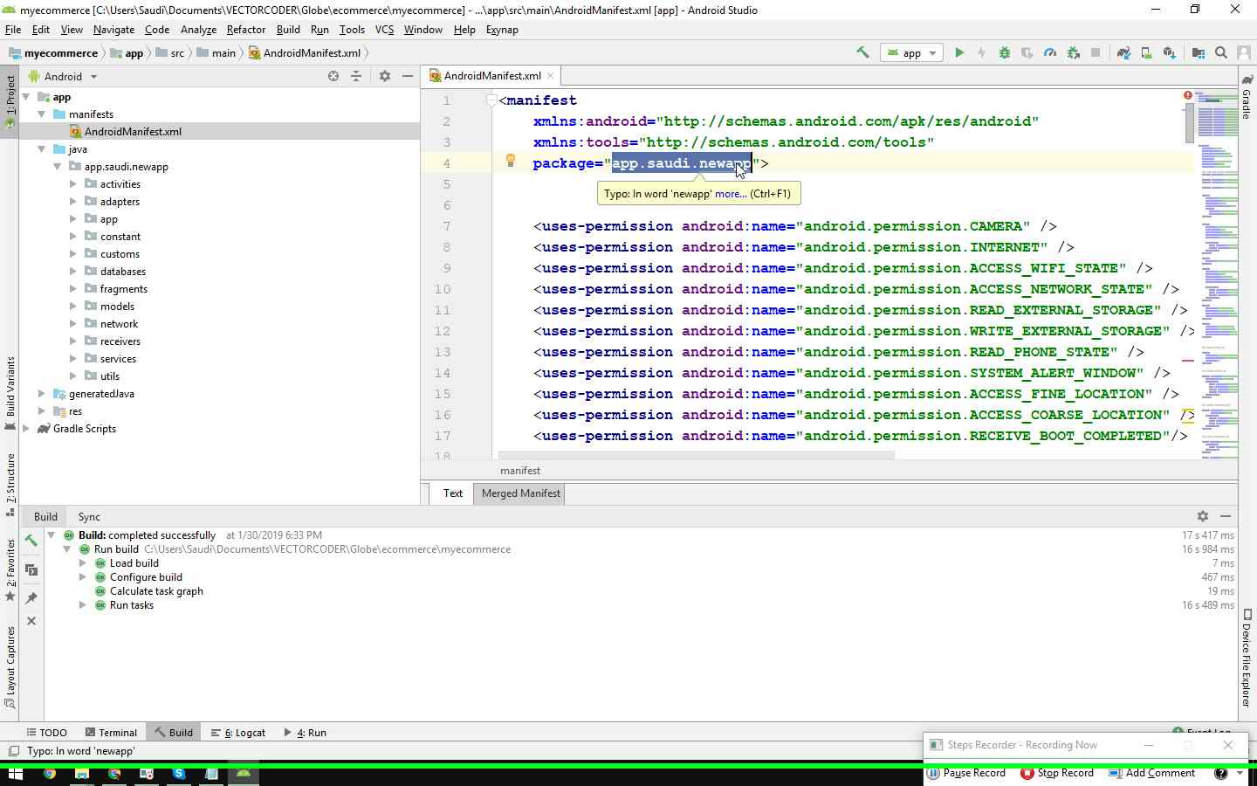
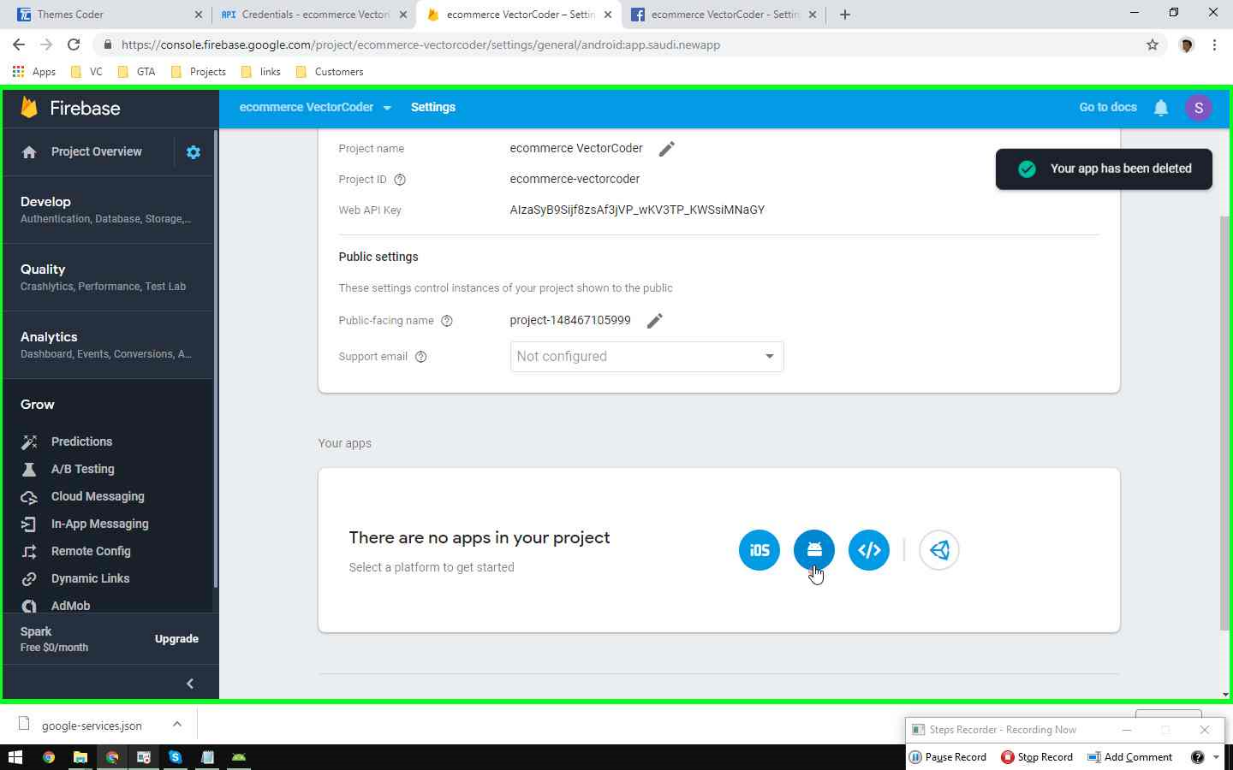
⦁ Next go to the Firebase Project and delete the previous app and create a new one with new android package name
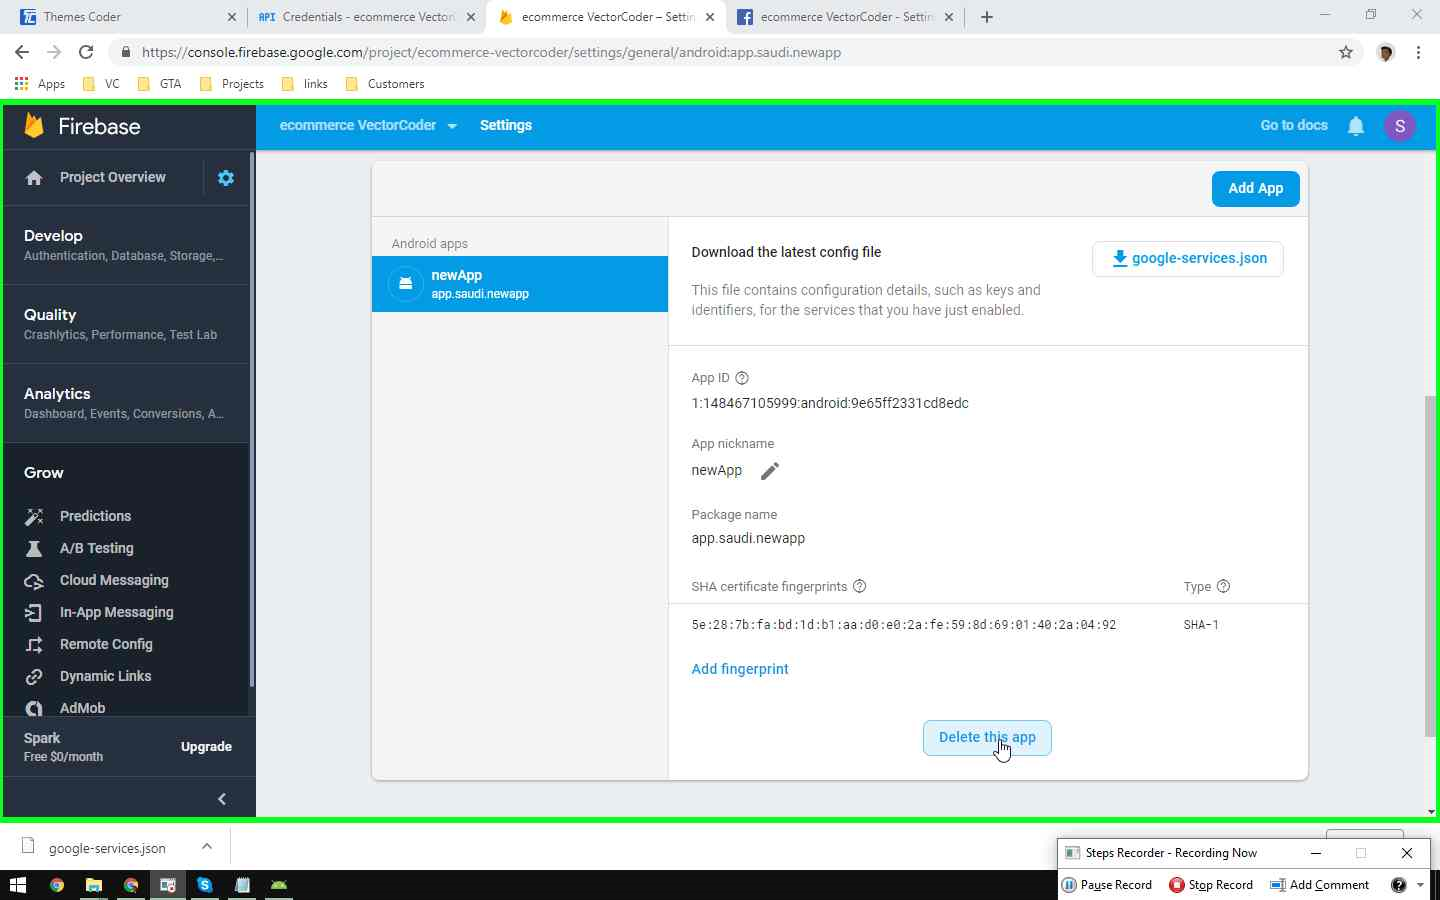
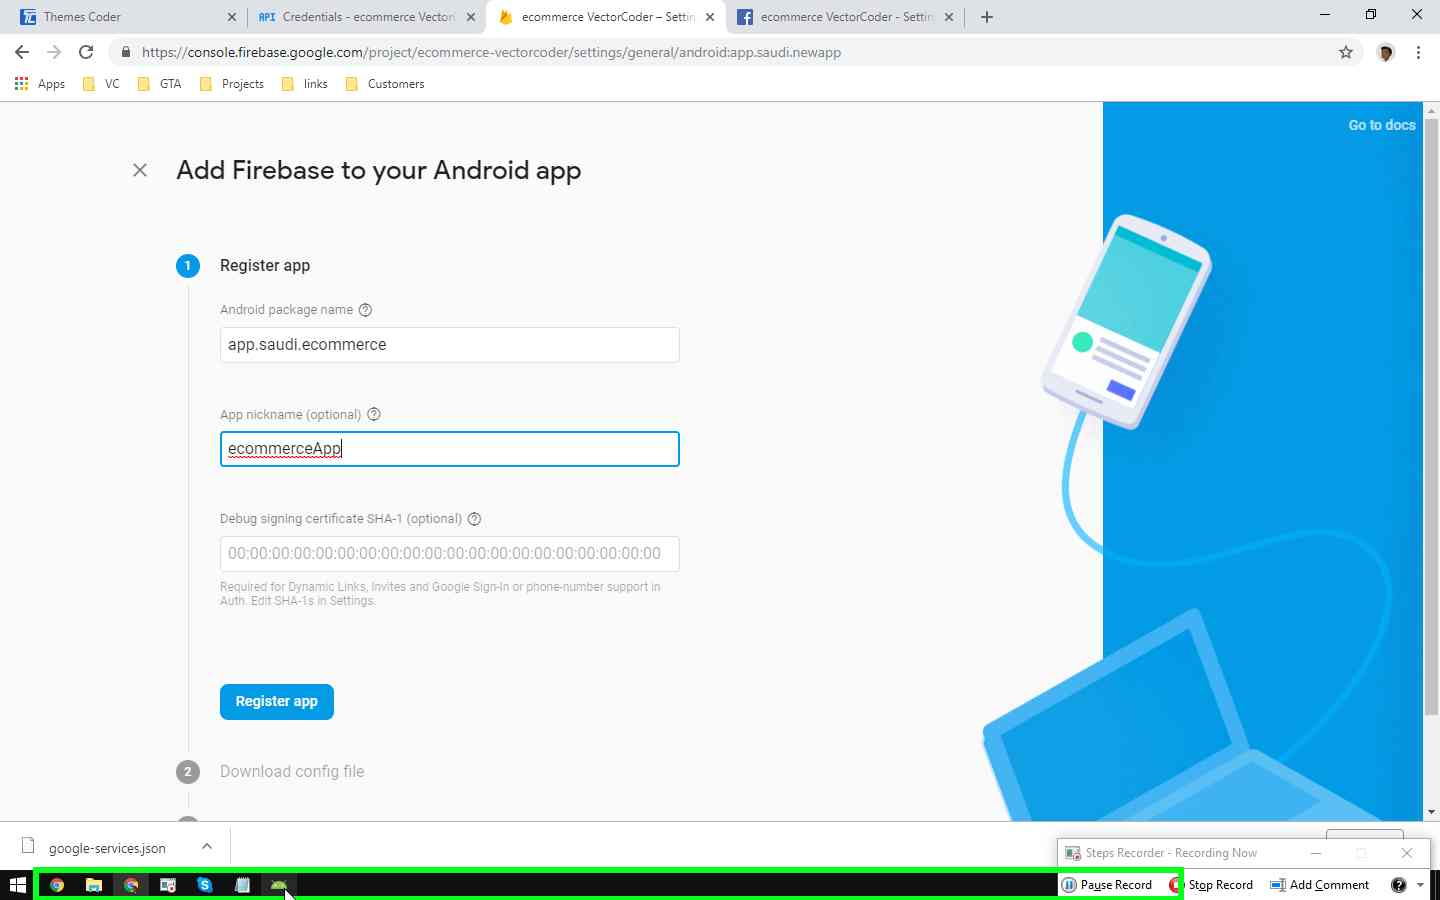
⦁ to add new app to the Firebase Project click on android icon.
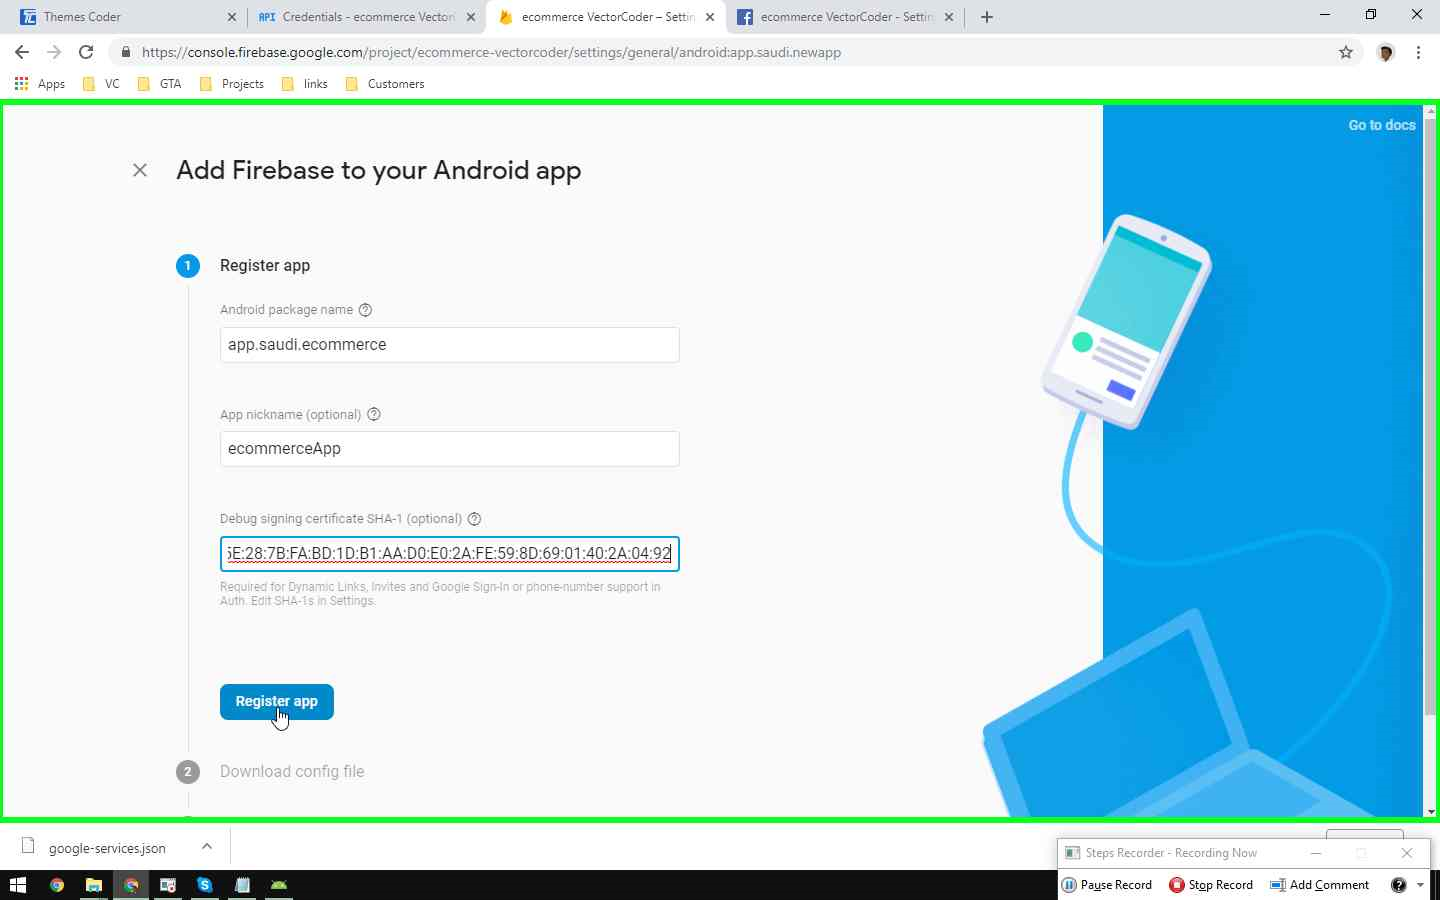
⦁ Next enter new credentials into the required fields.
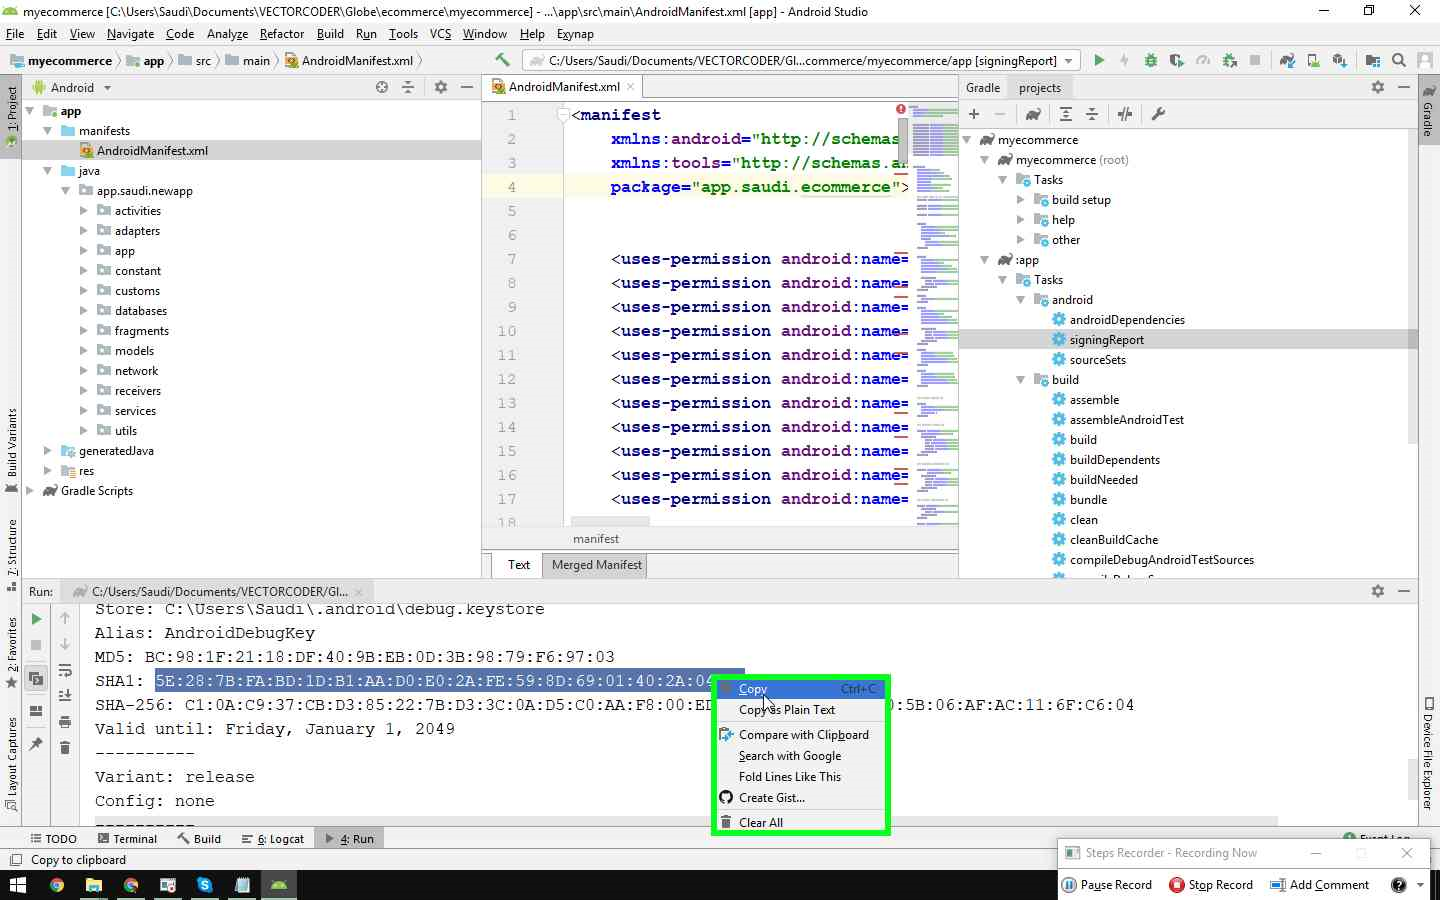
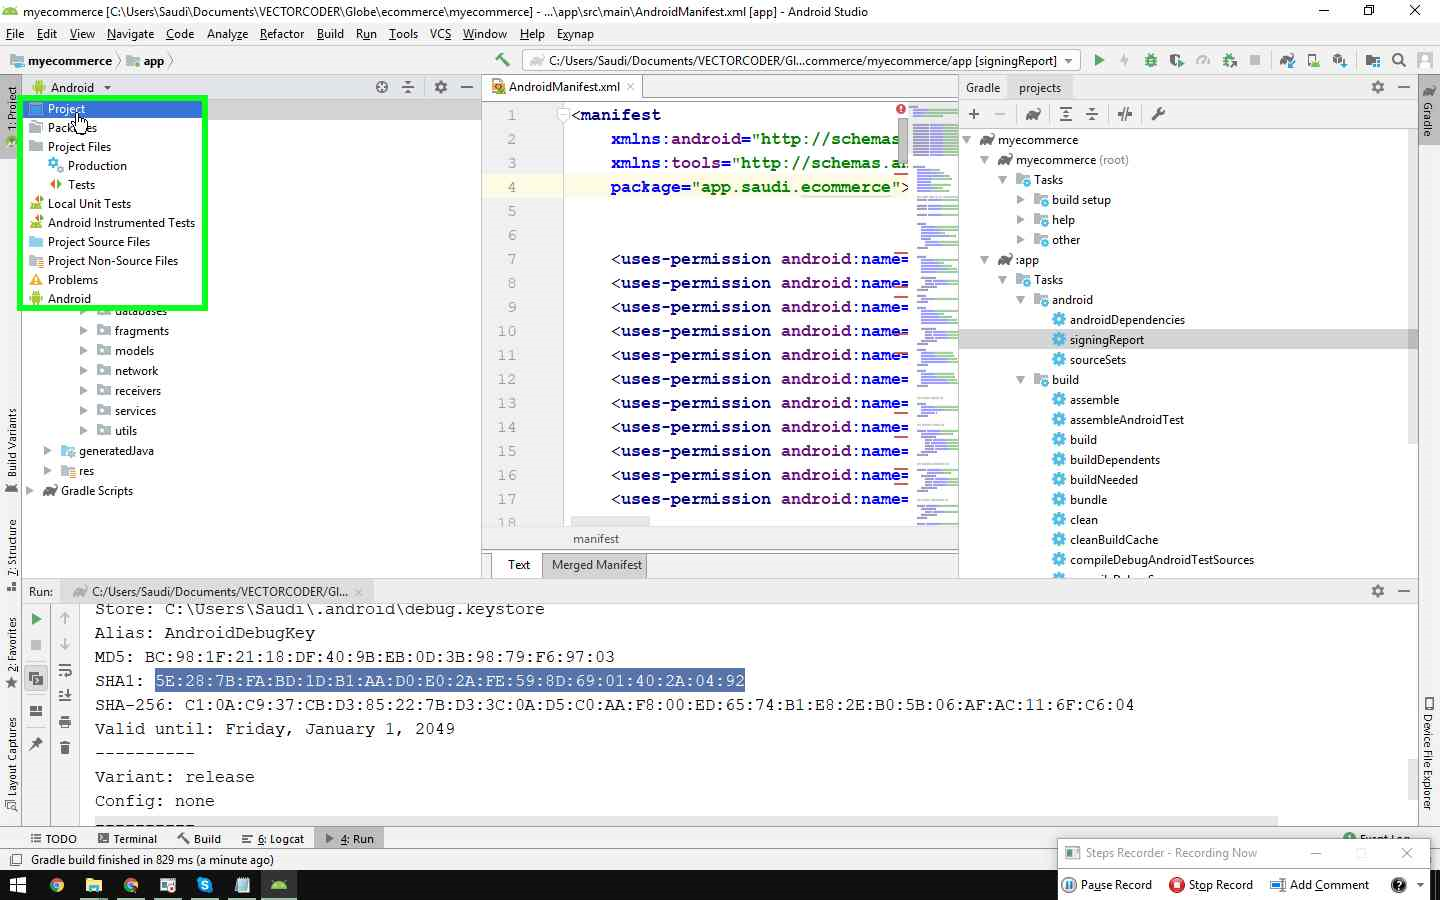
⦁ to get the new SHA-1 key execute a file shown in the image bellow by double click on it.
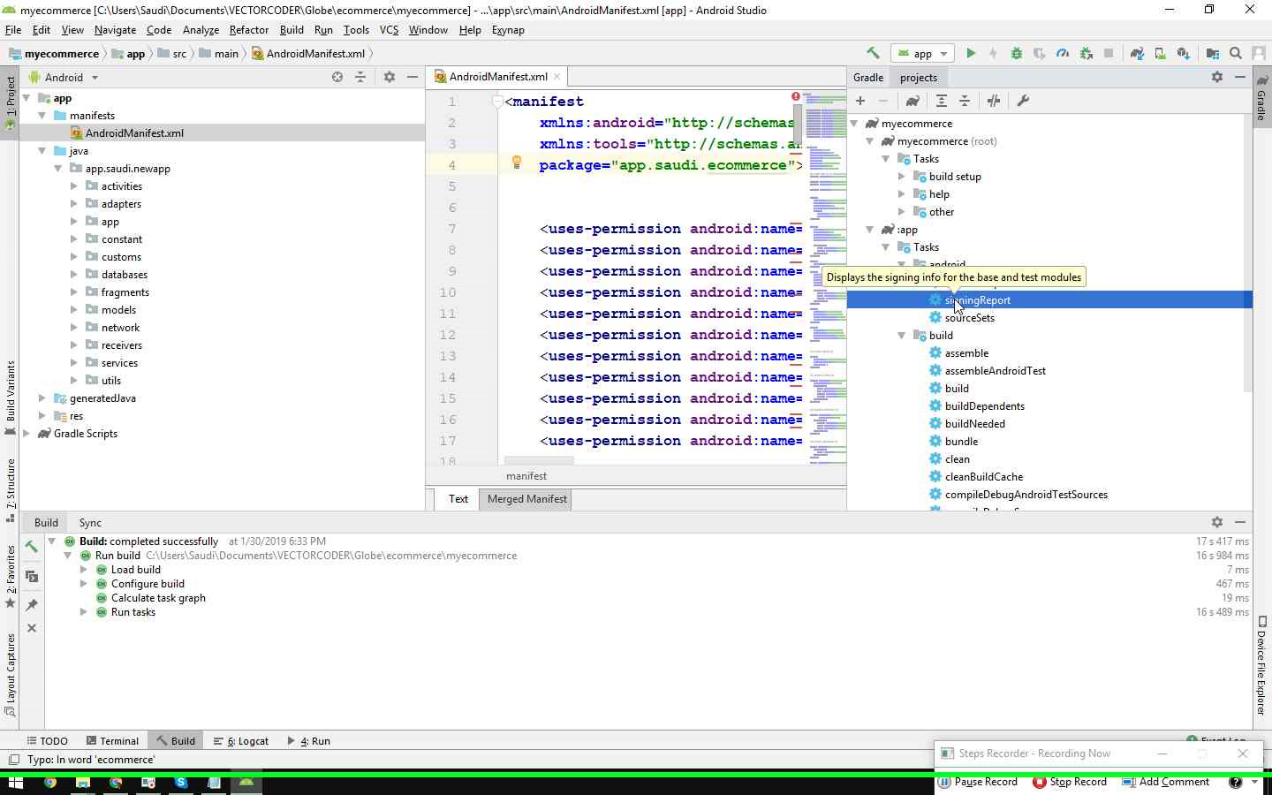
⦁ copy the SHA-1 key from here.
⦁ and paste it in the Firebase Project here. and hit Register App.
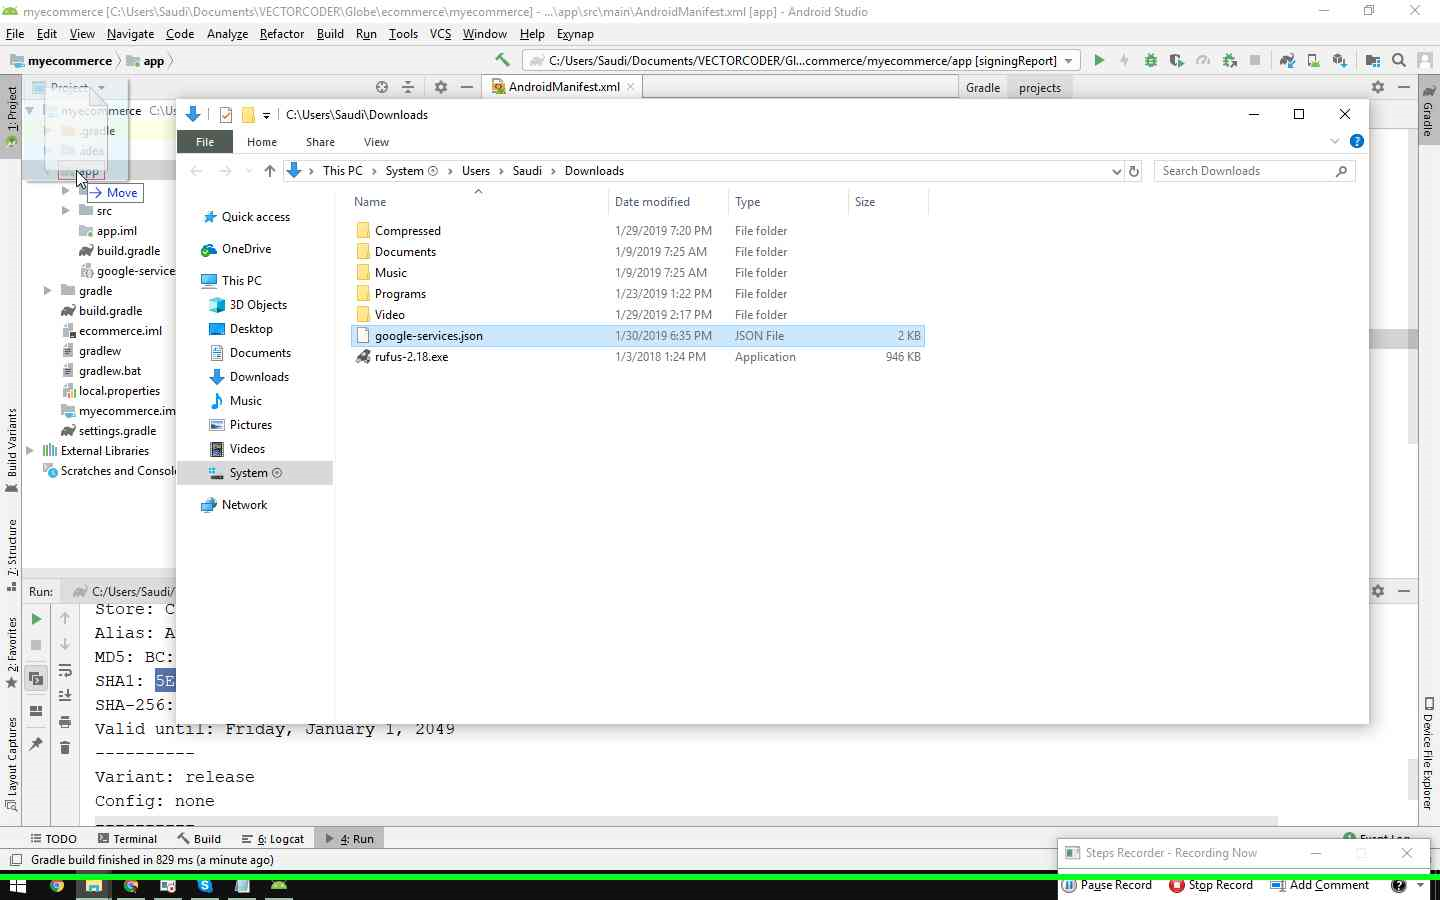
⦁ Next download the google-services.xml file from here.
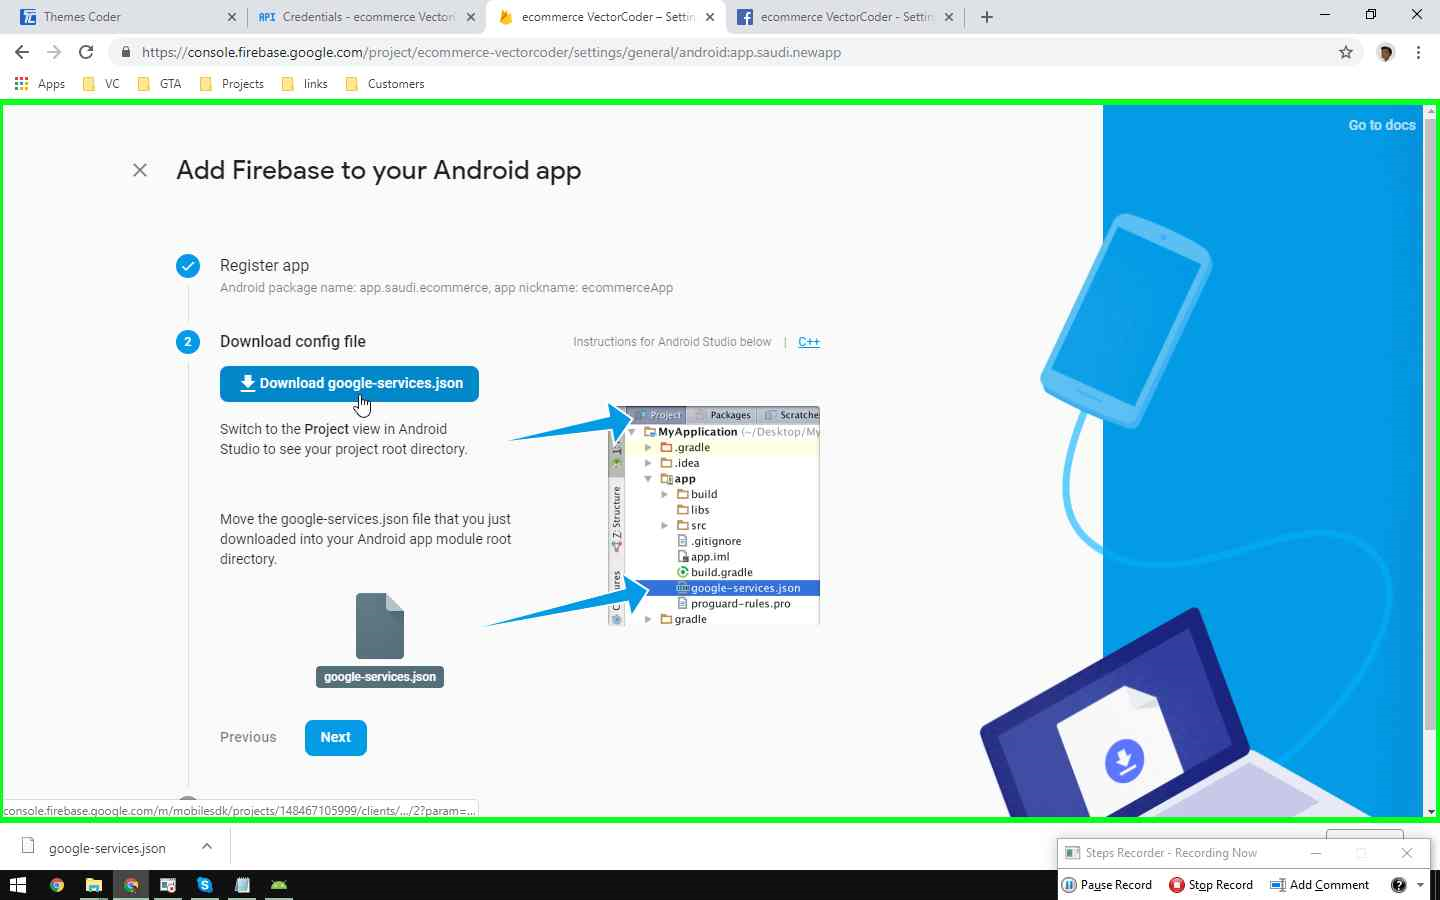
⦁ next change the android studio project view to the project.
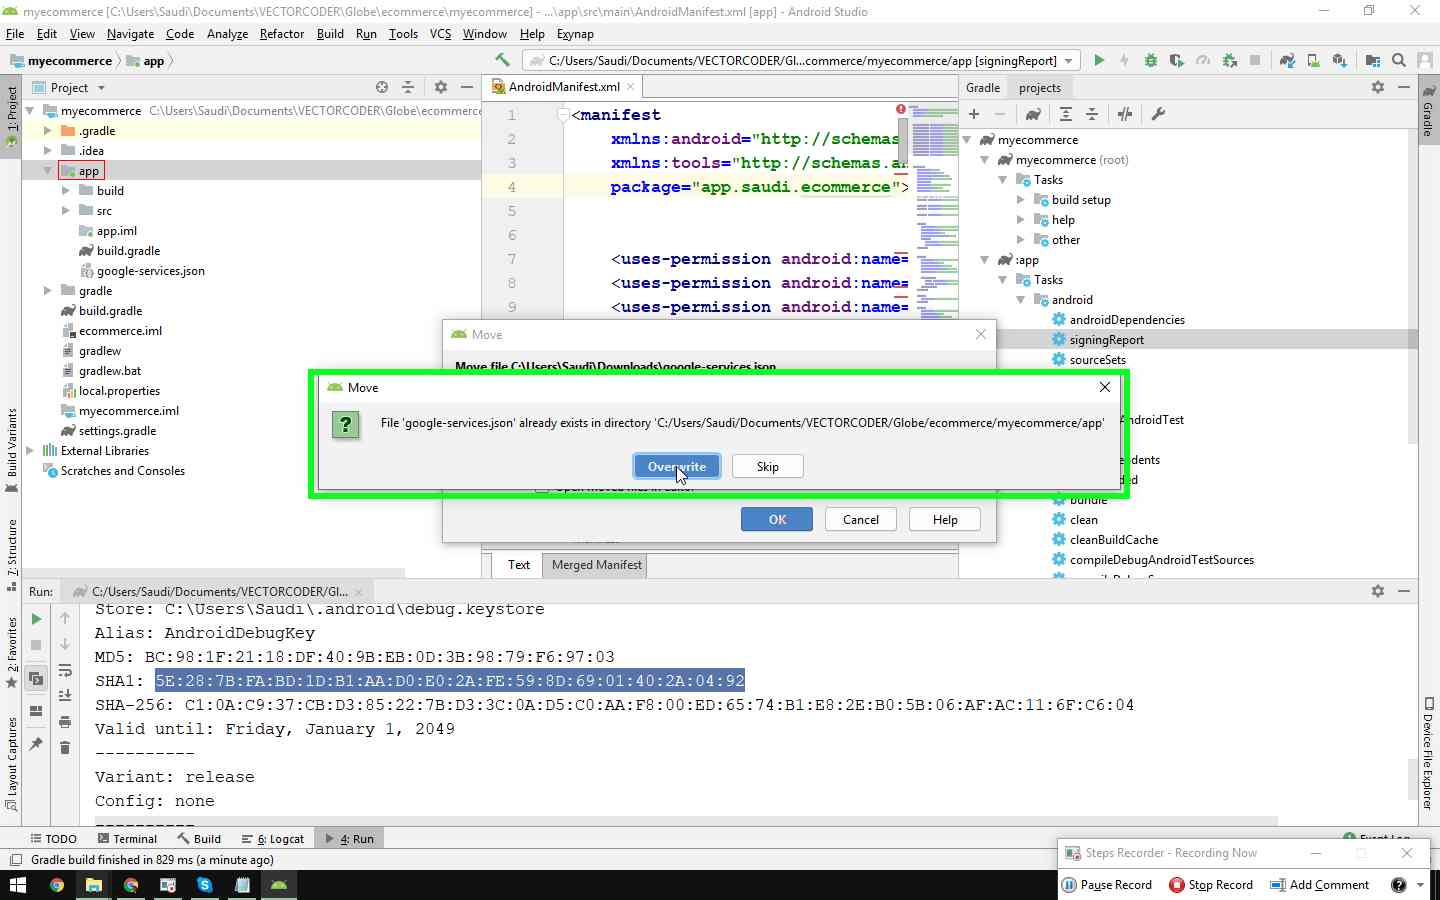
⦁ and move the downloaded google-services.xml file here in the app directory as shown in the image bellow.
⦁ hit Overwrite button.
⦁ Next also change the package name in the google projects, google cloud platform to the new one.
https://console.cloud.google.com/cloud-resource-manager?authuser=1
⦁ In the developer.facebook.com under the settings -> basic settings – > change the application id and application secret to the new one
⦁ after changing it to new one hit save changes.
Other Source Code Customization
Here is all the ui and resources files under the res package.
anim all the animations used in the activity transitions are placed here.
drawable folder contains all the media resources file like icons, logos and other stuff.
layout folder contains all the ui screens and layout files related to ui.
menu this folder contains the menu files like action bar menu and bottom navigation
menu.
mipmap this folder contains the launcher icon for the application.
values folder contains all types of values like all the constant string, integers, pixels,
dimension etc used in the project.
You are free to customize as you want you application.
One Signal Integration #back to top
open up the project and go to the settings -> project settings -> Cloud Messaging section and get a server key and Sender ID. and preserve it as it will be needed in future.
Now go the the OneSinal website and create an account if you don't have one through the link given below.
After that add an app to the onesignal platform and integrate it to the android project.
Now place these
- Go to Admin Panel and open SiteSettings page.
- Change Default Notification to OneSignal.
- Put your Onesignal App ID and Onsignal Sender ID (FCM Sender ID).
- Open app > java > yourpackagename > constant > ConstantValues.java
- Change DEFAULT_NOTIFICATION to onesignal.
- Open
build.gradle (Module). - Put your Onesignal App ID in manifestPlaceholders.
- Clean and Rebuild your Project
Note:Make sure that the Default Notification you selected in the Settings section in Admin Panel is same as the value of DEFAULT_NOTIFICATION in ConstantValues.java in Android Studio
Delivery Boy #back to top
You can add in file path app/java/com.themescoder.driver/constents/ConstentValues.java
- YOUR_BACKEND_URL
- YOUR_CONSUMER_KEY
- YOUR_CONSUMER_SECRET
Then add app/res/values/string.xml
Get your YOUR_GOOGLE_API_KEY and paste it.
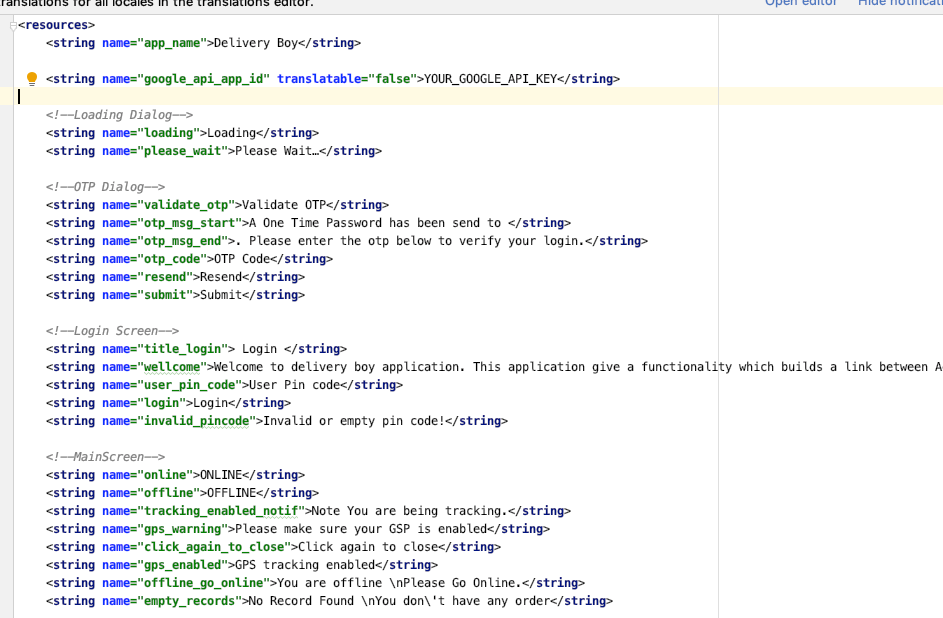
Finally apply your YOUR_ONESIGNAL_APP_ID here.
Your file path is app/build.gradle(App Module)
Now build your application.
Media #back to top
This section is specified for all your media-related images if any. For instance, when you have to display and upload any image related to any product or for any other purpose, you need to upload it first to the media gallery section using give link below.
http://yourdomain.com/admin/media/add
In order to add more images or media files, click on the add new option and upload images in pop up window.
Click on the middle section and upload the files existing on your computer hard drive. Any file that you upload here would be readily available in your media section to be uploaded to your website.
Media Settings
#back to top
The media settings section allows you to adjust the size of your media-related files i.e images that you uploaded to the media section.
Use the following link to change your media setting.
Language Settings
#back to top
This section is meant to select the language for your website. The integrated by default language is English only.
You can use below link to add language.
Website Translation(Add New Language)
If you want to add any other language, go to add new option and define the new language you want to be implemented on your website. For this, you will have to do the data entry in the same language.
Step 1) Name: Enter the name of the desired language i.e french
Step 2) Code: Define a certain ISO Language code that is assigned to every language. i.e fr
Step 3) Direction: Define the direction of your desired language in which manner it is written. For instance, English is written from left to right.
Step 4) Icon: Add a specific icon of the language.
Step 5) Click on Submit option on the bottom and you are done with the process. The language has been added as shown below.
To Add Translation for website.
Step 6) Now go to /resources/lang folder and copy en folder and paste it with new name i.e ‘fr’
Step 7) Folder have multiple files. Open website.php in any editor and change labels as per your needs.
Step 8) Save File.
Note: Please don’t change the key, change only it’s values.
Currency Settings
#back to top
US dollar is the standard integrated currency. You can add further currencies according to your desire and business pattern, this would require a bit of customization skill but one case still easily add a new currency through the Add New option.
http://yourdomain.com/currencies/display
Note: You can as many currencies as you can but if you want to add new currency as base currency then you should have to edit base currency which is U.S.Dollar by default but value of base currency is 1 which is not changeable.
Customers
#back to top
This is about all registered customers who can use store. You can click Add New for add new customers.
Use below link for Customers
http://yourdomain.com/admin//customers/display
Now you have full access of your customers as you can add New Customer , perform action like you can edit customer, edit address and delete customer.
Manufacturer
#back to top
Through this, You can add manufacturers of your products and associate them with products under products section.
To add Manufacturers use following link.
Categories
#back to top
The categories section allows you to create categories for your eCommerce store. For instance, if you run a clothing store, you may need to add categories like Men’s Clothing, Women, Kids etc.
Categoies Listing page Link
http://yourdomain.com/admin/categories/display
By clicking on Add New, you can add your defined category.
http://yourdomain.com/admin/categories/add
Fill the above-given columns correctly and a new category would be generated.
Step 1) Category: This is the primary name that you need to assign to a certain category. For instance, this might be kids clothing, Men’s suiting etc.
Step 2) Name: Assign here the name that you want for the subcategory i.e, jeans, shoes, scarf etc.
Step 3) Image: Assign an image that better reflects the class or type of the category.
Step 4) Icon: Add an additional icon that further elaborates the category.
Step 5) Status: Set the status as active or inactive as there might be times.
when you are not selling some specific item that you were selling previously. In this scenario, set the active status for those which are actively being sold.
Finally, click on submit and you will be done with a new category addition.
Units
#back to top
Here you need to add the units in which you deal. For instance, if you deal in products that ought to be weighed, you have to add weight units i.e grams, kilograms etc.
Use below link to Add Units.
Products
#back to top
In this section, you can add all of your products one by one.
Here is the listing page of your all products.
http://yourdomain.com/admin/products/display
By clicking on the Add New option, start adding as many products as you like by entering each product’s details separately and individually.
Note:Before adding products, make sure that you have already uploaded all the relevant media files to the media section or else you will not be able to upload images directly from your computer’ hard drive.
In the below-given link, fill each section with care one by one.
http://yourdomain.com/admin/products/add
Step 1) Manufacturer: Select here the specific predefined manufacturer of a certain product that actually manufactured the product. For instance, you may have some Levis articles displayed on your website. So choose the manufacturer accordingly.
Step 2) Category: Here check the category in which a certain product falls. I.e this may fall under jeans or Snickers.
Step 3) Is Feature. Select whether the product is featured or not.
Step 4) Status: Select the status whether the product is actively ready for sold or is dormant at the current time.
Step 5) Product Price: Mention here the selling price of the product at which you are offering a certain product.
Step 6) Tax Class: Here select the certain tax class under which the product falls. For instance, a beer can may fall under the alcoholic class, a bar of chocolate may fall under the edible tax class.
Step 7) Min Order Limit: Here you can set a minimum number to be ordered for a certain product. For instance, there might be some products in batches that you do not sell in single pieces.
Step 8) Max Order Limit: Here you can set a maximum order limit.
Step 9) Product Weight: Mention here clearly the weight of the product in meters, grams or kilograms.
Step 10) Product Model: Mention here the product model number that you have assigned to each product separately. For instance, BMH109 for a certain T.shirt.
Step 11) Image: In the image section, add a clear image of the product that is identical to the actual product.
Step 12) Video EmbedCode Link: You can add your embed code link here like your youtube link.
Step 13) Flash Sale: Select yes if this certain product is to be shown in the flash sale, otherwise select no.
Step 14) Special: Choose yes if a certain product belongs to a deal or offer otherwise select no.
Step 15) Product Name: Mention here the product name in English and all other languages that you have selected in relevant columns.
Step 16) Description: Briefly define here the product with some of the details that you feel necessary to be mentioned here.
Step 17) Click on save and continue and you are all done with adding a product.
Inventory
#back to top
Inventory section allows you to maintain a record of the available stock category wise. You must be tackled this feature very carefully.
To add inventory of your products use below link.
http://yourdomain.com/admin/inventory/display
Enter the details of each product separately. Enter the available units that are currently in stock, you may enter a referral purchase code as well.
Note: Here Minimum and maximum levels allow you to set a certain limit for a certain product to maintain a level of stock. I.e what minimum/maximum number of the product essentially be there in stock.
Reviews
#back to top
Here you will see the list of Rating & Reviews of individual product. You can active / inactive the reviews.
To manage reviews use below link.
Order Status
#back to top
This allows you to assign different statuses to the orders that are placed i.e Pending, Completed, Cancel and return etc.
Use below link to add Order statuses.
Orders
#back to top
This section informs you about all the orders that have been placed till date and also about their status whether they have been delivered, pending or cancelled whatsoever the case may be.
You can also assign orders to deliveryboys
Use below link for list of Orders.
Low Stock Products
#back to top
This would show a sum total of customers order.
Use below link for low stock product list
Out of Stock Products
#back to top
The products that have run out of stock.
Use below link for out of stock product list
Customer Orders Total
#back to top
This would show a sum total of customers order.
Use below link for customer order list
Products Liked
#back to top
This would intimate about the products that are liked by the customers.
Use below link for product liked list
Countries
#back to top
Countries of all around the world are added here for data entry purpose.
Use below link for Countries
http://yourdomain.com/admin/countries/display
You can also add new country by click on Add New button
Use below link for add new country
Zones
#back to top
Furthermore, the countries are divided into zones to specify the area.
Use below link for zones
http://yourdomain.com/admin/zones/display
You can also add new country by click on Add New button
Use below link for add new zone
Tax Class
#back to top
Through this option, you can choose a certain tax class for certain products that fall under a specific tax class. For instance, some products may fall under the garments class, some may fall under the edible class.
Use below link for list of tax classes
http://yourdomain.com/admin/tax/taxclass/display
Use below link for add tax class
Tax Rates
#back to top
Here you can get all Tax rates of different zones with respect to there tax classes.
Use below link for
http://yourdomain.com/admin/tax/taxrates/display
Through Add Tax Rate, you can define the percentage of applicable taxes specifically for certain zones.
Use below link for add tax rates
Coupons
#back to top
These are the incentive coupons that are offered to the customers. Customize all your coupon related settings here.
Use below link for list of coupons
http://yourdomain.com/admin/coupons/display
Click on the Add New option and following window will pop up which has following link for add new coupon
Shipping Methods
#back to top
This enables you to choose the shipping method that you allow for the delivery of ordered products. To manage shipping methods use below link.
http://yourdomain.com/admin/shippingmethods/display
Above given URL contain shipping methods list that are integrated with the app. You can choose any one of them according to desire.
Payment Methods
#back to top
This section allows you to choose the payment method that you deal in. The below-given methods are already integrated into the app.
You can Manage your payment methods using below link.
News Categories
#back to top
Here you can define or specify a certain news category i.e New Arrivals, or any developments going on with your business that you want to make public.
Use below link for list of news categories
http://yourdomain.com/admin/newscategories/display
Use below link for add news category
News
#back to top
From here you can publish news separately under different categories.
Use below link for list of news
http://yourdomain.com/admin/news/display
Use below link for add news
Devices
#back to top
From here you can get all devices for notification purpose.
Use below link for list of all devices
Send Notification
#back to top
You can send notification message for all or specific platform devices from here.
Use below link for send notification message
Store Settings
#back to top
This section allow you put all detail of you store including your general settings, inquery Email, order Email, orders andour info.
Below here you can get the link of store settings
Web app environment. Select maintenance when some maintenance work is going on to the website, otherwise select live when all the desired changes have been made.
Maintenance text. Choose the text that you want to be displayed to the visitor while maintenance work is going on.
Website link. Place here your website link.
App name. Mention here your app’s name.
New product duration. Select here the duration or number of days for which you want some certain product to remain in new product section i.e 20 30 etc.
Google maps api.
https://developers.google.com/maps/documentation/javascript/get-api-key
This is the link to find out your Google map APPContact us email. The customer would contact you through this email.
Order email. All the customers willing to make an order would send an email to this email address.
Free shipping on min order price. Set the minimum amount of order at which free shipping would be offered.
Our info. Enter here all your business related details. This info would be shown to your customers.
Alert Settings
#back to top
These settings are related to sending and receiving alerts when you execute some certain act. I.e
1. Create customer welcome email: This intimates the customer through email as welcome note.
2. Create customer welcome notification: By selecting this option, the customer is intimated through a notification.
3. Order email: By selecting this option, the customer would be notified through email on placing an order.
4. Order notification: This would be an intimation through notification on placement of order.
5. Order status email: This email would intimate the customer about the status of the order placed.
6.Order status notification: This option would intimate the customer through a notification.
7. New product email: This would be an intimation through email when a new product is added to your store.
8. New product notification: This intimation would be sent through a notification on addition of new product in store.
9. Forgot password: This intimation would be sent when the customer login password is forgotten.
10. Adding news email: An email would be sent when you add a news to news section.
11. Adding news notification: This intimation would be made through a notification when some news is added to the news section.
12. Email contact us: An email would be
sent when the customer click on the contact us option.
Use below link.
Firebase Setting
#back to top
You can enable disable you Google map and google credential here.
You can get all credential by creating firebase app using firebase console. Official link of firebase is below here
https://firebase.google.com/docs
Below here you can get the link of firebase map
Home Page Builder
#back to top
Choose Header: Select here your desired header styles.
Carousel: Choose from here the desired carousel style that you want to implement.
Banner section. Select from an array of already added banner styles, or you can also add further.
Tab product view. This is to enable or disable the tab product view option.
Flash sale section. This is a dedicated section for products that are added in your flash sale.
Categories. This section allows you to activate or deactivate your predefined categories section.
First Parallax banner section. There would appear an ad section on the website. The first Parallax banner section is optional. If you do not want this to be displayed, simply disable it.
Top selling. This is meant for your top selling products. Enable or disable this section according to your desire.
Second Parallax banner section. There would appear an ad section on the website. The second Parallax banner section is optional. If you do not want this to be displayed, simply disable it.
Newest product section. This displays your newest product additions. Disable it if you do not have any new products at the moment to be displayed in this section.
Third Parallax banner section. There would appear an ad section on the website. The Third Parallax banner section is optional. If you do not want this to be displayed, simply disable it.
Blog section. This section is dedicated for your recurring blogs.
Info boxes. This section is dedicated for info, select it according to your requirements.
Choose footer. The last one is for footer. Select the desired footer from all available options.
Use below link to customize your homepage.
Site Color Page Settings
#back to top
This section contains more than 20 sass compiled colors for website. You can select one of your desired color from them.
Use below link to select your desired predefined colors.
Site Banner Transition Settings
#back to top
This section contains more than 5 transition or hover effects for website. You can select one of your desired transition from them.
Use below link to select your desired transition effect.
Product Card Settings
#back to top
There are different available card styles for how you want your product to be displayed on website. Choose the style that you like.
Use below link to select your Product Page.
Category Widget Settings
#back to top
This options allow you to select image or icon to be show on homepage and also allow you to select the number of records in a slider.
Use below link to select your Product Page.
Top Offer Banner
#back to top
You can add your Offer text with desired Link. To modify use below link.
Login Page Settings
#back to top
There are two available options for how you want your login to be displayed on website. Choose the style that you like.
Use below link to select your desired Login Page.
News Page Settings
#back to top
There are different available options for how you want your news to be displayed on website. Choose the style that you like.
Use below link to select your News Page.
Shop Page Settings
#back to top
Here you are provided with different shop page styles, select the one according to your needs or preferences.
Use below link to select your Shop Page.
Cart Page Settings
#back to top
There are two different style options for your cart page. Choose the one that you find more suitable.
Use below link to select your Cart Page.
Contact Page Settings
#back to top
There are two different options for contact page. One with google map and other one more textual type. Choose the one that you like more.
Use below link to select desired Contact page.
Product Page Settings
#back to top
There are different available options for how you want your product to be displayed on website. Choose the style that you like.
Use below link to select your Product Page.
Slider images
#back to top
All the images to be used in slider will be added through this window. Enter all the relevant information appropriately.
Use below Link.
Parallax Banners
#back to top
Constant Banners
#back to top
You can choose mutilple style Banners for you website.
Use below Link.
Content Pages
#back to top
This page is dedicated for essential content that explains different policies of your business that are essential i.e privacy policy, terms and service, refund policy and about us. Fill in all the details accordingly and the content would show up in the dedicated section by default.
Use the following link to Add Pages.
SEO Content
#back to top
This content is meant for your different SEO campaigns. You can add SEO Title, SEO Meta-Tags, Keywords and Description.
To add Seo Contents Use below Link.
Custom CSS/JS
#back to top
This section is dedicated for further customization that you want to do on your part. Place the custom CSS in this section that you wish to be implemented.
To add you custom CSS Style use below link.
Instagram
#back to top
This section allow you to instgram post in footer section. For This please set your account profile to public.
To add your instagram user id use following link.
Website Settings
#back to top
This section allow you to add your wesbite basic requirments.
To add your website settings please following link below.
Banners Images
#back to top
All the images to be used in slider will be added through this window. Enter all the relevant information appropriately.
Below here is link for list of banner images
http://yourdomain.com/admin/banners
Here you can add new banner
Content Images
#back to top
Here is dynamic page content for App seprated by page slug.
Below here is link for list of pages content
http://yourdomain.com/admin/pages
Here you can add new content for page
Admob Settings
#back to top
You can add you Addmobe setting here. Use below link.
App Labels
#back to top
This URL allow you to add or change translation.
App Settings
#back to top
Here you can get
1. General settings where you may can select different styles.
2. Display In Menu/Sidebar where you may can display different pages which you want.
3. Local Notification where you can specify the notification details.
This URL allow you to add all above essentials.
Delivery Boys
#back to top
Feature where you can get all the details of delivery boy.
Here is link to get details of delivery boy
http://yourdomain.com/admin/deliveryboys/display
Below is link wehre you can add new delivery boy
http://yourdomain.com/admin/deliveryboys/add
You can manage deliveryboys Personal Info, Vehicle Info, Bank Info and can set commision.
Floating Cash
#back to top
Floating cash is the cash in hand after delivery boy delivered the order. You can manage check Floating cash by given URL.
http://yourdomain.com/admin/deliveryboys/floatingcash/display
Settlement
#back to top
This section contain the amount to be paid to the delivery boy.
Delivery App Content Pages
#back to top
This page is dedicated for essential content that explains different policies of your business that are essential i.e privacy policy, terms and service, refund policy and about us. Fill in all the details accordingly and the content would show up in the dedicated section by default.
Use the following link to Add Pages.
Deliveryboy Status
#back to top
You can manage delivery boys statses by using this section.
Use the following link to manage statuses.
Deliveryboy App Setting
#back to top
This section contain deliveryboy app settings.
Use the following link to change setting.
Admin
#back to top
This feature is related to the authentication purpose. Through this feature, you can add more admins other than you, and assign them different roles in handling the website.
You can get admin roles list below
http://yourdomain.com/admin/admins
You can add Admin Through given link.
http://yourdomain.com/admin/addadmins
Admin type: Choose the admin type here.
First name:
Last Name:
Telephone:
Street address:
Zip/Postal code:
City:
Country:
State:
Email address:
Password:
Status:
Manage Admin
#back to top
You can assign different roles to specific users. This implies that you can ascertain the role that other users can play while managing the website.
Here you can add the admin type through given link below.
http://yourdomain.com/admin/addadmintype
Admin name: Mention the admin name.
Status: set the status whether the mentioned person is an active or inactive admin.
Updater/ Bug Fixer
#back to top
Here you can apply bug fixes if any or updates in codes provided by us. You just upload .zip file and apply your purchase code.
http://yourdomain.com/managements/updater
Chooose Zip : Upload file provided by author for bug fixes/ updates in code
Purchase Code: Add your code caynon purchase code
Backup/Restore
#back to top
To get the backup of your database, you can apply purchase code here
Restore
#back to top
For observing the responce and understanding of CMS working, we provide you demo files(SQL sample data) where can get the product, categories and much more for demo purpose.
Download our Sample SQL Dump From here.
https://www.dropbox.com/s/y7dnbq8p11wdtfw/laravelg_demo_content.zip?dl=0
Apply demo file here